One of my favorite crafty blogs is Cheri’s I Am Momma Hear Me Roar. That lady can craft like nobody’s business, and I’ve learned freezer paper stenciling and how to use Picnik straight from her blog.
So I was super excited when she decided to host a contest just for boy crafting– specifically, for a boy t-shirt. Having two boys myself, I totally get the dearth of good boy craft projects. So I set out to make something cool.
I’ve been waiting to try out the freezer paper stenciling, and just the other day I saw this post about “batik” table linens from Martha Stewart’s Craft of the Day email– I use scare quotes here because it’s really nothing like batik, but that’s what they call it. I decided to combine them with an idea I had been mulling over to make a kind of pointilist graphic tee for my four year old.
I wanted to take a more abstract-ish graphic of the globe and render it in pointilist fashion on the t-shirt. So I found a globe I liked and gathered my supplies. You will need:
- a white t-shirt
- a graphic printed out to the size you’d like on the shirt
- freezer paper
- fabric markers
- tape
- a hole punch, preferably with three size holes and that will punch anywhere on the page**
- self-healing mat
- an iron
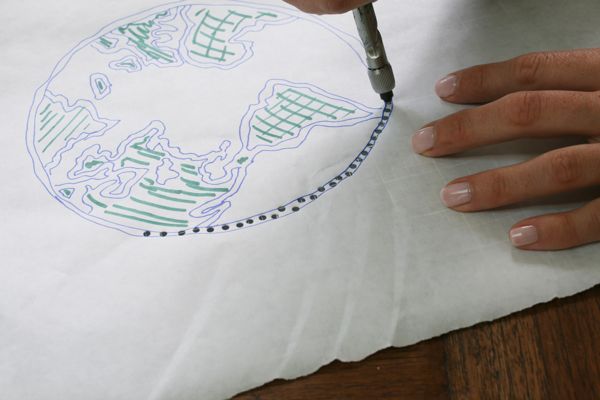
** Side note here on the hole punch. I highly recommend the Martha Stewart Screw Hole Punch. You see it pictured in the photo below. What’s great about it is that it punches anywhere– that is, you can punch right in the middle of the page because it doesn’t have a hinged mouth-like opening. It also comes with three interchangeable sized circles, which all fit snugly and neatly in the top, under a screw cap. It’s really an ingenious design. You can find them at Michaels.
First, tape the graphic to the back of the freezer paper. You want the shiny side of the paper facing down, so you can trace the image on the matte side.
Flip the paper over so your graphic is under the freezer paper, and start tracing the image onto the freezer paper. You basically just need to know where one color ends and the other begins for this project.
When it’s done, you should have something like this:
You’ll notice I’ve really just indicated where I’ll have different colors; the parts I left white I will make light blue (for the oceans). You can now remove the image from the back of the freezer paper.
Now it’s time to become a pointilist. You want to start punching holes in various sizes, knowing that you will color them according to the drawn pattern on your stencil. I started by punching around the outside; I made all the dark blue (which is essentially the outline) the same size punch– the middle size in my set.
Make sure you can still see where the colors need to go. Then, start punching the other areas. When you are all done, you should have something like this:
Then, you iron it onto your t-shirt where you want your design to fall. (If you need detailed instructions on doing a freezer paper stencil, check out Cheri’s tutorial here.)
Now you’re ready to get at it with the fabric markers. Using a stenciling motion– that is, tapping more than writing or sliding the pen– color each circle the proper color. Be careful not to let the sides of the freezer paper peel up.
Once you’ve got the whole thing colored in, it will look like this:
Then, you can peel off the freezer paper…
And there you go! A fun, graphic tee that’s a little different. I kind of love it.
Here’s the model showing it off:
 There you go! I’m entering this shirt in Cheri’s contest, so keep your fingers crossed for me!











Oh, how I love that model! The shirt rocks, too!