For my review of the Sally Hansen Insta Gel Strips, go here.

For my experiment using regular polish with the gel system, go here.

So, I mentioned in a recent post that I discovered this Sally Hansen at home gel nail kit, and I jumped on it since I love my gel manicures. I wanted to give you all a more in-depth review and show you some images since I haven’t seen a lot of detailed reviews around the interwebs.

The product I bought was the Salon Gel Polish Starter Kit, NOT the Insta-Gel Strips. This is an important distinction. I’ve tried those “strip” polish thingys before, although not in the gel version, and in my opinion, they are a total pain in the keister. They’re always wrinkling, and it’s so hard to get them to sit just where you want on the nail. So this kit is actually polish that you paint on your nails, like a regular gel mani at the salon.

First, let me tell you, I LOVE this kit. It’s exactly what I’ve been waiting for. I’ve been tempted to buy an at home gel kit for a while, but the ones I was looking at at Sephora were between $150 and $200, and I thought, if they don’t work that well, that is a lot of money to have wasted. So when I saw this kit at $65, it seemed perfect. I pay $45 for each gel mani at the salon, so by using it twice it will have paid for itself. (Actually, I’ve already used it 3 times, so it’s done and paid for!)

Besides the fact that the price is right and it’s readily available at stores like Target, it actually works really well. It’s really not that different from a salon gel mani, except you have to do it yourself.

I would say that the only downside, in fact, is the DIY element. If you aren’t skilled at painting your nails, you might get a little frustrated. But otherwise, it is a total go.

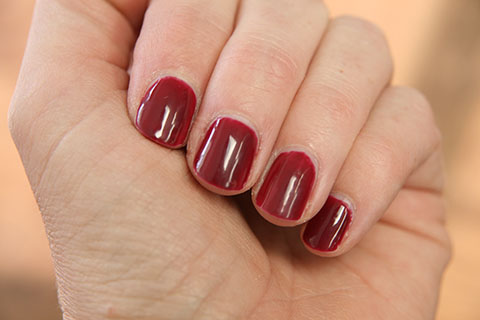
Let me show you a few images. I did a manicure a few weeks ago with a nice deep red color called “Ruby Doo.” This is what the manicure looked like after about 10 days:

So, pretty nice, right? You can see that there’s some new growth down by my cuticles; that’s one of my biggest problems with the gel mani. It lasts plenty long, but my nails grow so fast that after a week or 10 days, I need to redo it because the growth looks weird. So having the option of doing it at home more frequently and not having to pay for all those salon visits is great.

Taking it off is really easy, too. I’ve tried all the salon versions: Oxxium by OPI, Gelish, Shellac, you name it. And I found that some of them come off easier than others. This Sally version comes off really well, as long as you keep them wrapped for the allotted time. If you aren’t familiar with the wrapping version of removing gel polish, you take a cotton ball, soak it in acetone polish remover, put it on the nail and wrap it in aluminum foil to keep it on there. What I do at home is take those flat cotton rounds, like these, cut them in half, and soak them in some acetone. Then I put them on the nail and cover it with foil.

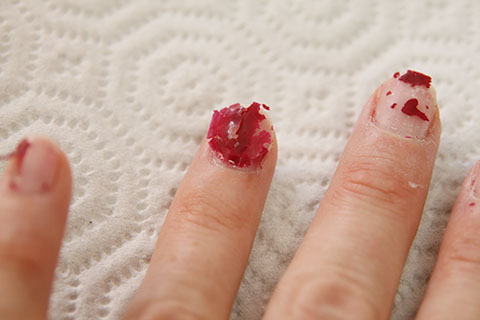
Now, here’s where you have to follow the directions and not be impatient. If you leave the foil on for at least 10 – 13 minutes, the polish will literally flake off. Basically all you have to do is brush off your fingers. If you try to hurry it up and check it after 8 minutes or so, there will likely still be some polish adhered to the nail, which can be hard to pry off. And the prying damages your nails. So sit back, watch some Homeland or something, and let the acetone do its work.

Here’s what you get once you take the foil off the nails:

It really does just flake off. Then, you can shape and file and attend to your cuticles and whatnot, and start the polishing process.

The kit comes with a small LED light, which fits all four fingers at once, and then you do the thumb separately, to ensure it gets dried properly. Since it’s an LED light, it cures the polish much faster; I’m used to having my fingers in the lights at the salon for 3 minutes per coat, but with this little light, it’s only 30 seconds. It’s amazingly fast.

The process for applying the gel manicure is the same as at the salon. There’s a base coat, then LED curing, then 2 coats (or more, if you prefer) of color, with curing after each, and then a top coat with curing. Then you use some alcohol (or the little alcohol pads the kit provides) to wipe them clean and shine them up. Boom! You’re done.

I really couldn’t be more delighted with the kit. I’ve already stocked up on 5 or 6 different colors. I still plan to get a salon manicure, every once in a while, maybe once every 2 months? That way I can get my cuticles professionally “groomed” and just maintain at home.

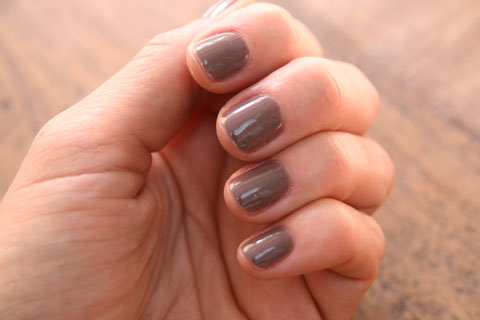
After I took my Ruby Doo off, I used “Commander in Chic” to do this manicure:

A few tips I’d recommend with this kit:

~ Do one hand at a time, as the instructions suggest. Much less chance of a slip up.

~ Make sure you keep the acetone pads on your nails for at least 10, and probably more like 13, minutes. You will be able to tell when all the polish flakes off. You shouldn’t need to scrub or pry it off.

~ Use a cotton swab dipped in acetone to fix any mistakes, i.e., polish on your skin, before you cure it. Otherwise, it’s a little hard to peel off your skin.

So, if you are a fan of the gel manicures, I highly, highly recommend this system. I’m so glad I found it!

Let me know if you have other questions in the comments!

Share!

{ 141 comments }

Leave a Comment

Cancel reply

  • December 13, 2012, 2:21 pm Karen

    I’ve used this twice now and it has started to lift or chip after 2 days? Not sure what doing wrong?

    Reply
    • December 13, 2012, 7:07 pm Beth

      Hi Karen… Hmmm, that’s weird. Where is it lifting, by the cuticle or at the tips? Are you making sure your nails are perfectly clean before you paint them? If there’s any oil or lotion on them that could affect how long it stays. Or, if you get any on your skin, that can affect it because it pulls off your skin and then takes some off the nail with it.

      Reply
    • March 7, 2013, 8:32 am Rebecca @ Polish Etc

      Not to butt in, but I had this problem as well! It just means you used thick coats so they didn’t cure completely. If you warm the polish (run the sealed bottle under hot water) and polish in a warm place it’s easier to get thin coats.

      Reply
      • March 7, 2013, 8:44 am Beth

        Oooh, this is great information Rebecca! Thanks for sharing. I have used the SensatioNail again and didn’t have that problem, so it makes sense that it would be something other than the brand that was the issue. Thanks again!

        Reply
  • December 19, 2012, 9:46 pm katie

    This is valuable information! I saw it in Target the other day and considered it, but didn’t know enough. Now I do. Thank you!

    Reply
  • December 28, 2012, 2:29 pm Beth

    Great info, I just bought this kit 5 mins ago and was looking for some reviews as I’ve looked into several brands but came across the Sally Hansen today and got it. Have you tried using it as a clear coat with no color? Or tried using any color polish other than Sally Hansen? Just wondering if I have to stick with that brand or if I can use other brands colors! Thanks!

    Reply
    • December 28, 2012, 2:51 pm Beth

      I haven’t tried either I those things, but I think the clear coat would work great. Don’t know about other brands… Now I’m curious! :-)

      Reply
    • April 22, 2013, 6:17 pm Eleni

      The Sally Hansen instructions say you can skip the color step, so clear should be fine. I am curious if anyone else has used it with other nail polishes too. I have a lot of colors already that I love and I would like to still use them with the gel!

      Reply
      • April 22, 2013, 8:49 pm Beth

        Hi Elani… Someone up thread said they used regular polish with the kit and it worked. If you read some of the comments from the bottom up you’ll see the info. Hope that helps!

        Reply
  • December 28, 2012, 4:12 pm Beth

    Well I just read in the directions that you can skip the color step and do base/top coat for a clear finish (which is what I was thinking) but ill be interested to find out about other brands. I’ll let you know if I play around with other brands. :)

    Reply
  • January 1, 2013, 9:59 am Jesse Glassford

    I would love to start doing gel manicures at home but I am concerned about what my nails will look like after the gel comes off. There are lots of sites out there that say putting gel on your nails for so long (2 weeks) is damaging. How do your nails look after you take off the gel? Also, do you have to use only the Sally Hansen color that comes with the kit or can you use any nail polish.
    Thanks!
    Jesse

    Reply
    • January 1, 2013, 10:23 am Beth

      Hi Jesse! I don’t think it’s the long-wearing that’s the problem, I think it’s how you take it off. If you let the gel come off all the way (by putting some cotton with acetone on it and wrapping the whole thing in foil), instead of peeling or prying it off, I haven’t experienced any weakening of my nails. Some salons also file the surface of your nail before applying the gel, which can also weaken, but if you don’t do any of these things, I really haven’t seen any problems. That said, I had gel manis at salons that did these things for a while, so my nails were slightly weakened from those manis, but the parts of my nail that are grown out and have only had the at home gel are quite strong. On the polish front, you do have to use the special gel polish, not just any regular polish. I find Sally Hansen has a good, though limited, range of colors, but what I don’t know is whether you can use *other* brands of gel polish with this system. I’m thinking of testing that out soon. Hope that helps!

      Reply
  • January 4, 2013, 9:58 am Beth

    Well I used my kit and it worked great. It lasted 5 days before any problems (one day is a miracle on my nails) so for a first try, I say that’s good! I could have just fixed the 2 issue nails but I loved the excuse to play with a different gel brand polish I bought. It’s sensationail (got at Walmart for just under $10) and went on just the same! I’ll let you know if it lasts but seems just the same.

    Reply
    • January 4, 2013, 10:00 am Beth

      Awesome! I can’t wait to hear if the different brand works just the same. Did you use the Sally base and top coats and just use the different brand color polish?

      Reply
  • January 8, 2013, 10:26 am Beth

    Yep, I used the Sally top coat and bottom coat that came with my original kit and just used the other brand polish. So far I’m at almost 5 days and no problem at all (and I’ve been really rough on my hands the last few day: moved furniture, cleaned/used cleaning products, etc) so it passes in my book! So I had 5 days red and now 5 days of grayish color = 10 miraculous days of polished nails!!!!

    Reply
    • January 8, 2013, 10:27 am Beth

      Amazing! I bought the SensatioNail color yesterday to try out with the Sally Hansen. I might get one of the OPI colors, too, just to check brands. Thanks so much for this info!

      Reply
  • January 15, 2013, 4:15 pm Beth

    Well, I’m 12 days into these sensationail nails and no issue! I wanted to redo them to something different on Sunday but we had a family emergency so it hasn’t happened yet but they are still going strong with no touch ups! Only issue is the grow out but nothing with the polish :)

    Reply
  • January 20, 2013, 3:00 pm Laura Loftus

    I’ve already bought the insta gel kit….doesn’t sound good. Love the look, scared the strips or any gel stuff will be harmful to my nails. I have fast-growing, strong nails and do not want to hurt the nail bed. After reading some reviews I think I bought the wrong kit? Thanks for your advice.

    Reply
    • January 20, 2013, 8:14 pm Beth

      I don’t think the insta gel strips will hurt your nails any more than the regular gel kit. I have just found the strips terribly difficult to work with. They are super thin, and they wrinkle easily and can fold over on themselves… I could just never get them to work properly. But if that’s not a
      problem for you I think the kit should be fine.

      Reply
  • February 5, 2013, 7:42 am Michelle

    I love how my nails turn out with this gel kit although I’ve had an issue with my nails drying, at the salon they are dry once I leave but with this kit I literally have to sleep on them hoping they won’t get ruined bc it takes this long for mine to dry completely. Am I doing something wrong ?

    Reply
    • February 5, 2013, 9:00 am Beth

      Your nails shoul be completely dry when you finish the top coat cure. Are you wiping them with alcohol after that last step? You need to use the little alcohol swabs they provide to wipe them off after the last cure… If you don’t they’ll be dry but sticky.

      Reply
      • April 1, 2013, 8:07 pm Sara D

        Thank you for saying that! I thought I had read all the instructions and couldn’t figure out why they were tacky afterwards…I totally missed the step about wiping them. Now they feel wonderful!!!

        Reply
        • April 1, 2013, 8:54 pm Beth

          So glad I could help! I can’t get enough of the gel nails. :-)

          Reply
  • February 17, 2013, 2:18 pm Penney

    Can you do touch ups in between full manis? If you get a chip on the end or want to change colors before a full mani. Do you file the surface of your nail before the mani as suggested in the literature? If your nail is clean and oil free, do you think you need to? My nails are weak and peal on the ends. I am trying to get them to grow out and stop the pealing. Can you put a small amount just under the tip if your nail is long enough not to get on your skin? Would this help the tips from chipping? Thanks :-)

    Reply
    • February 17, 2013, 5:10 pm Beth

      Hi Penney… It depends on what you mean by touchups. I’ve never had this polish chip, so I never have the need to reapply only on a small area of a nail. Do you mean if you want to change colors without taking off the old polish? I suspect that wouldn’t work very well since it would get very thick… the gel polish is slightly thicker than regular polish, so with 8 coats on, it might be too thick. I don’t think you need any under the tip of your nail, because the polish really doesn’t chip. If you did, you’d have to cure it under the light with your hand upside down, so you’d want to make sure enough of the LED light would get into the space where you put the polish. Otherwise, it doesn’t dry. :-) I don’t file the surface of my nail before I polish; I don’t find you need to.

      Reply
      • February 17, 2013, 7:07 pm Penney

        Beth, Thank you for the answers to my questions.

        Reply
        • February 17, 2013, 7:10 pm Beth

          So glad to be of help! :-)

          Reply
  • February 27, 2013, 8:37 pm Gail

    Loved your review. Am thinking of getting the same kit for my teen age daughter. The main thing I like about the home kit is the LED feature. The ultraviolet lights that the salons use cause skin cancer and the LED’s do not. A big plus. Thanks for all your details.

    Reply
  • March 5, 2013, 9:24 am Ana

    Can I use a regular, non-gel nail polish in between the base and top coat?

    Reply
    • March 5, 2013, 9:25 am Beth

      I don’t think so. I’ve never tried it, but I think you need the gel polish that “cures” with the LED light.

      Reply
  • March 7, 2013, 7:17 pm Lilly Roc

    I’m a long time fan of gel polish. Today I decided to give a try to this DIY kit. As I had already an AXXIUM pot T home, I decided to go one step forwardand use my favorite color with Sally Hansen gel polish home kit. It worked perfectly fine. It’s absolutely necessary use a thin coat or prolong the expose time, and the last step of using the cleanser alchool pad too. Otherwise the nail get sticky.

    My suggestion after 1 week is pull the cuticules very carefully, trim it if you like and apply on the top of the gel a coat of regular nail polish (same color). You won’t believe but I use this trick for up 1 month (redoing cuticule and new coat every week)! No chip nail after only 3 days of a regular manicure. I save a lot of money and my nails are always neat.

    Reply
  • March 9, 2013, 2:00 pm BG

    Love it also but having difficult time finding the base and top coat to replenish as well as the pads to clean. Initially used alcohol wipes but if another brand of top coat used its unsuccessful, dulls finish.

    Reply
    • March 12, 2013, 9:27 am Beth

      They sell both kits that contain just the base and top coats and the alcohol pads as well as the base and top coats separately. Wherever I see the gel kits, they have had the refills. I’ve used just alcohol with a cotton ball and it’s worked great.

      Reply
  • March 13, 2013, 8:54 pm MimiHolliday

    Hi ladies so I have had the Sally kit for about 2 month now. Twice I used the Sally brand and within 2-3 days the edges chipped. I have been using shellac for about 2 years now at a salon and never had a problem. I figured I wasn’t being thorough enough around edges. I then saw Sensational at local Walgreen and gave it a try. It stayed for about a week. I’m starting to wonder if Sally brand just isn’t a good a match for my nails. Anyone having this problem?? Any suggestions? I wipe my nails with alcohol prior to polish.. Not sure what else can it be?

    Reply
    • March 13, 2013, 9:53 pm Beth

      Hi! Hmmm, I’m not sure about this problem, either. The SensatioNail worked better? You might also try the Sephora brand of gel colors. With the SensatioNail, did you use the Sally base & top or the SensatioNail base & top?

      Reply
  • March 15, 2013, 8:25 am Megan

    Is the alcohol on the pad used for wipping the tacky stuff off the same as rubbing alcohol? I have run out of the pads from the kit faster than the polishes!

    Reply
    • March 15, 2013, 8:44 am Beth

      Yes, indeed! I usually just use rubbing alcohol and a cotton ball. I’m sure they’d love to sell you more of their lovely packaged “wipes,” but it’s just alcohol. Save the money! :-)

      Reply
  • March 17, 2013, 11:20 am Kara

    I was looking for a good deep red color. The Ruby Doo box makes this look almost purple. But on your nails it actually does look like a deep red! Maybe I’ll try this one.

    Reply
    • March 17, 2013, 1:38 pm Beth

      Ruby Do is really a deep red, and the Red My Lips is more of a traditional, bright red.

      Reply
  • March 21, 2013, 7:25 pm Rachel

    Just wondering has anyone tried the gel strips? Was also wondering if I can use regular strips or do they they need to be the gel strips.
    Thanks

    Reply
    • March 21, 2013, 8:29 pm Beth

      They definitely have to be the gel strips to get the extra long wear. I haven’t tried the gel strips, but I’ve tried the regular ones, and I find them very difficult to work with. I’d rather just paint the coats on. I might try the gel strips, though, just to review them and see how they compare. I’d be curious to hear from anyone who’s used them…

      Reply
      • April 27, 2013, 1:35 pm Robin

        I bought the gel strips kit 2 weeks ago, because I needed a french manicure for an event, and have NEVER been happy with the results in salons or DIY. If the salon did a great job, it chipped in a day or two (I’ve never paid for a gel manicure in a salon).

        Using the strips wasn’t too difficult; if I didn’t get it centered where I wanted it, I was able to to lift it off and re-position. I suspect they’re probably easier to use than ordinary strips, because they’re not a ‘done deal’ until they’re cured.

        I kept the manicure for 10 days. I had just a bit of chipping at the cuticle, but it was because I had a bit of top coat where it didn’t belong, and as it grew out, it was lifted above the nail surface. The manicure came off VERY easily after wrapping and waiting a full 15 minutes (I set a timer!). I’m looking forward to using the Red My Lips strips that came with the kit, and then I’ll probably pick up some base coat and gel polish and see how that goes!

        Reply
  • March 31, 2013, 5:36 pm Lera

    Guys, can you help me, please?!
    I bought that kit, but the problem now is that I don’t know which one is base coat and other top coat. I thought I don’t need stickers on the bottle like 1 step, 2 step. How I can identify which is base coat, which is top coat?

    Reply
    • April 1, 2013, 12:00 pm Beth

      Hi Lera! I am looking at my gel polishes, and other than the white and black labels on the caps which I think you removed, I can’t see any identifying markers that distinguishes one from the other. Once, I accidentally put the base coat on as a top coat and it didn’t shine up properly at the end. So my only recommendation would be to put one on one finger, and one on another. Cure them under the light, and then wipe them with an alcohol swab. The one that gets shiny and smooth after wiping is the TOP coat. The base coat should get kind of cloudy and not wipe off cleanly with the alcohol pad. If that doesn’t work, I’d say your best bet is to buy a refill kit that has just the base and top coats.

      Hope that helps!

      Reply
  • April 2, 2013, 1:32 am Yas

    Hi Beth! Thanks a lot for the info. I just wanted to know if you can add your own nail art like rhinestones, stockers or stamping right before the top coat? I love doing my nails and nail art and I don’t want to get the kit if I won’t be able to do some nail art with it. Thanks a lot! :D

    Reply
    • April 2, 2013, 12:00 pm Beth

      I would guess that if you use the gel nail polish to do the art, it would be fine. I would maybe add the rhinestones after the top coat? I don’t know much about nail art, but keep us posted if you try it with this kit!

      Reply
      • November 8, 2013, 10:21 pm Robin

        Yes, you can use nail art (stickers, multiple colors, rhinestones) before you apply your top coat. You will need to apply a second top coat layer to ensure longer lasting nail art. I too love the Sally Hansen gel polish kit. I have very weak nails and have tried everything to strengthen my nails. Gel polish is my best find yet I love it!!

        Reply
  • April 4, 2013, 12:28 pm Jennifer

    The base coat has a pink brush and the top coat has a clear brush. Also I have a question. After I apply top coat and cure. Can I then go back over with another color coat and top coat and cure after each of those? I just got my kit today and didnt have much time to spend on my initial application so I only did one color coat. And now I dont really want to take it all off and start over.

    Reply
    • April 4, 2013, 12:37 pm Beth

      I don’t see why you couldn’t do that. It seems like the top coat is really the one that seals it in. I haven’t tried it but it seems like it would work fine.

      Great to know about the brushes… I thought one of mine was just stained from a color polish!

      Reply
  • April 4, 2013, 12:42 pm Jennifer

    Thank you for your quick response!!!

    Reply
  • April 5, 2013, 5:55 am sherrie

    Loved the kit, works well if all instructions are followed. Allergic to something, will eliminate till I figure it out! Need to find application method to limit coats and curing. I’m hoping 2-step strip & top coat? Did 8 nails of
    polish method, applied 2 nails of ‘regular’ polish strips design (white with script writing) then s.h. top coat. Looks awesome, strips said ‘throw away unused strips’ :( I kept in opened package, placed in baggie with alcohol on cotton rounds. Think they can be kept & used again? Only want designs for accent. Any more helpful hints appreciated! What opi polish was talked about? Thanks more than you know!

    Reply
    • April 5, 2013, 7:31 am Beth

      Hi Sherrie! I’m interested to hear if the regular polish strips plus gel top coat last. Please let us know!

      Sorry to hear you’ve had an allergic reaction! I hope it isn’t too bad.

      I just tried the insta gel strips yesterday & will do a review next week. I’ve used the regular strips before, and I agree it seems to wasteful to throw them out, especially if you are only using 2. However, I will say that the main problem I’ve had with keeping them is that they dry out, and once they’re dried out they don’t really stick anymore. I’ve tried keeping them in a sealed ziploc baggie, which helps, but you still need to use them fairly quickly.

      You might try the insta gel strips, since they require only 1 cure per nail… You put on the strips & a top coat & cure once. More on that next week when I do a strips kit review!!!

      Thanks for reading!

      Reply
  • April 5, 2013, 7:57 am Tara

    Hi, I love getting gel nail polish at the salon as an alternative to fake acrylic/gel nails. My concern is the strength my nails get from the polish at the salon. I naturally have weak nails and the gel polish helps to keep them from breaking without ruining them. Have you noticed any difference in that specific quality?

    Reply
    • April 5, 2013, 8:12 am Beth

      I actually love the gel nails for a similar reason, because they keep my nails strong. The home kit is just as strong as the salon version. Honestly, the only difference I can tell between the salon and home version is that you have to do the home version yourself!

      Reply
  • April 10, 2013, 10:20 pm Alana

    Not to be a party-pooper, but I was super excited about this as I am a DIY kida girl. In the week that I’ve had this product, it had peeled twice within. 24 hrs. I’m not impressed and wondering how you all got the results you did. I’m applying thin coats, curing between, and making sure to get the tips. Nothing is working. The strips on the other hand, I put on my toes and cured with top coat and they’re just fine. Could it be that I have acrylic nails? Didn’t have this problem from salon, though. Any advise is welcome!

    Reply
    • April 11, 2013, 9:52 am Beth

      Hmmm, ok. So you have acrylic nails that you are then putting the gel on? I did a little research online and it seems that nail techs who use the gel over acrylic don’t use the base coat. I don’t know if that would make a difference. Are you making sure they are super clean and oil-free before polishing? And making sure that there’s no polish on your skin? I would maybe try wiping all your nails with alcohol before applying the polish and being extra sure that there’s no polish on your skin. Is it peeling from the tips or from the sides or base?

      Reply
  • April 11, 2013, 9:07 am Yas

    So I did end up getting the set in Shell We Dance. My first try, I had one rhinestone on each nail. Unfortunately, one popped off the next day in the shower. But the rest held on until I took it off 5 days later. My first attempt was not very good and it had started to peel. I did a second manicure and made sure it was not touching the skin, etc. I placed nail art stickers before the top coat this time. And I’m hoping this will stay better. :)

    Reply
    • April 11, 2013, 9:44 am Beth

      I love Shell We Dance… it’s my favorite of all the colors right now. Good to know that the other rhinestones stayed, though. Let us know if the stickers stay on this next time!

      Reply
  • April 11, 2013, 9:15 am Paula

    After reading your review, I bought this kit. Ifollowed the directions exactly along with your hints and tips. They turned out great!! I love it! I was scared at first because they were still sticky after putting them under the light, but after that last led light exposure, the last step with the alcohol wipe does the trick. They were absolutely dry, smooth and beautiful! I bought more colors yesterday. Can’t hardly wait till next time! Thanks so much for your great review.

    Reply
    • April 11, 2013, 9:43 am Beth

      I’m so glad it worked out! I seriously love that kit. :-)

      Reply
  • April 11, 2013, 5:44 pm Alana

    Thanks for the quick response! I’m not using a base coat. Just top for clear shine over my pink n white solar. The peeling starts at tips. After the first time I made the coat a lil thicker and made sure I got the ‘free edge’ really well. The top coat over the strips on my toes, though, is perfect! (Commander in chic) love it! Just really disappointed with nails. I’ve also tried curing longer…as y’all know its not a quick polish change, so I’m about to throw my hands up. Oh, and I didn’t buy the mini LED. I’m a DIY/frugal type girl, and purchased a relatively high powered UV LED (9 lil LED bulbs) light for $4ish at Walmart (camping accessories). I also have tons of high powered UV light bulbs for my DIY screen printing hobby…It does work, my toes are proof along with my nails curing. They just peel. And, yes, I wash & then swipe with acetone remover (not enough to ruin acrylic) then I buff to remove any shine. I’m at a loss. Somebody help me please!!! ;)

    Reply
    • April 16, 2013, 12:37 am stacey

      Wait. You’re curing your gel nails with a camping (uv) light from Walmart? OMG that is great.

      Reply
  • April 14, 2013, 11:58 am Alana

    Update: tried the Kiss brand top coat only and viola!! I have perfectly manicured glass like shiny nails!! And for only $6ish w/ coupon!

    Reply
    • April 16, 2013, 6:43 am Beth

      That is awesome! I don’t know the Kiss brand; did you find it at Walmart? I’m also wondering if the LED light you were using could’ve been the culprit. Did you check to see that the wattage, etc. was the same as the LED that comes with the kit? Maybe yours is too high powered or not high powered enough. Just a thought. But I’m glad you figured it out!

      Reply
  • April 16, 2013, 7:43 am Chris

    I used my Sally Hansen gel kit for the first time yesterday and everything came out fine except the “shine”. After the top coat cure my nails were super shiny and pretty but sticky. I did the last step and wiped them off with the alcohol pads and yes the stickiness went away but my nails went from super shiny to kind of flat and dull :( Is there something I did wrong when I wiped them down or should I use a different top coat?

    Reply
    • April 16, 2013, 1:56 pm Beth

      Hmmm, I haven’t had the dullness problem. Sometimes once I’ve wiped then with alcohol I kind of “polish” them on my pants or something, just sort of buffing them up after the alcohol. That seems to work, although I’ve never had major dullness.

      Reply
  • April 16, 2013, 11:07 am Yas

    So the nail stickers held on the entire time I had them (7 days). I took it off because the polish had started peeling from the cuticles (which was probably because of extra polish on my cuticles) and because I had gotten some new colors I was dying to try out. I got Troublemaker and Raisin the Bar.

    I painted Troublemaker and I did a few things differently. Usually when I do my nails with regular polish, I start at the cuticle and work my way down. This time however, I started about 1/4 of the way down from the cuticle and when most of the polish was gone, I went back and applied near the cuticle. I also used rubbing alcohol to clean up my mistakes as opposed to the acetone. It seemed to work much better for me. 3rd time seems to be the charm! Haha.

    I’ve gotten tons of compliments on the color of my nails. I absolutely love Troublemaker! Any suggestions for other great looking colors?

    Reply
    • April 17, 2013, 9:16 am Beth

      I really like Red My Lips, which is a true red, and Commander in Chic is a kind of taupey color that is pretty. For a deeper red, there’s Ruby Doo. I also like Pat on the Black, which is close to the ever-popular Lincoln Park After Dark OPI color. A deep, deep purple. And I have Greige, which is a nice grayish color.

      Reply
  • April 16, 2013, 1:08 pm amber

    Can I do nail art with this? I just got this kit and love it.the only thing I’m curious about is how to do nail art without messing them up or making them not last as long. I was thinking about doing them like normal then after the top coat and alcohol step, do my design then use the top coat again with led light? Wondering if anyone has done this with any success?

    Reply
    • April 17, 2013, 9:13 am Beth

      Amber, there is someone up thread who did some nail art… she has some info on that. I’ve never really done nail art before.

      Reply
  • April 17, 2013, 9:33 am Alana

    My UV has to be far more powerful and another perk is I can do more than one at a time…sounds silly, but I can paint all fingers and hold the light in my mouth and cure them all. Even played around with the time and 20 seconds is enough for clear coat, one at a time (which the top & base are THE SAME). The Kiss brand is a common brand found at drug & grocery stores and, yes, at Walmart. So for under 15$ I’ve got gelled nails n toes. It also works OVER regular nail polish AND polish strips. I hate that salons (at least here in Houston) claim you can’t and that it just won’t work. It does. No more $40-$60 trips to the nail salon. Just slap some $20 solar acrylic on and I’ll be on my merry way, thank you very much! ;)

    Reply
    • April 17, 2013, 10:02 am Beth

      Great! With the Sally Hansen kit you can do all fingers at once, although you do your thumb separately so that it gets full coverage instead of being tweaked sideways. :-) I’m wondering when you use regular polish, do you let it dry fully in the air first, or do you treat it like gel and cure it under the LED, or do you do something totally different?

      Reply
  • April 17, 2013, 10:26 pm Alana

    Ahhhh, I thought you were reviewing the single nail kit. Lol I let them air dry for a few min till tacky, not wet, and go for it.

    Reply
  • May 2, 2013, 10:40 am Christina @ Nail Strips Blog

    Awesome, I just started seeing commercials for these in my area and this is the first review I have been able to find on them. Overall do you think the results are worth the investment. I think the nails came out looking great but I heard the kit is over $100.

    Reply
    • May 2, 2013, 10:44 am Beth

      Hi Christina, The kit is about $60. It comes with one color, and other colors are $12 each. I definitely think it’s worth it; I usually pay about $45 when you include tip, parking, etc., for a salon gel nail manicure, so after 2 uses this paid for itself! And I’ve probably used it 15 – 20 times by now. It’s probably the best beauty investment I’ve made in the last 5 years.

      Reply
  • May 4, 2013, 6:45 am Char

    I went out and bought the SH Gel Nail Kit after reading your review and I have to say I agree with you 100% about this product!!! I had tried the NutraNail Gel Polish that did not need the UV light and was very disappointed: it did not last any longer than regular polish, although I followed all the directions. Took the plunge and bought the kit at Target and am a believer!!! Also did a pedicure with the polish/light and am excited about not having to touch my toes up too!!! Thanks for the helpful review!

    Reply
    • May 17, 2013, 7:49 am Beth

      So glad it helped you!

      Reply
  • May 5, 2013, 4:32 am Banquet Halls Philadelphia

    WOW, what an amazing nail polish color. Both of the shades are pretty but I like most second shade. Banquet Halls Philadelphia

    Reply
  • May 17, 2013, 6:07 am Julia

    Hi! I made the same mistake as someone else and removed the labels on the gel base coat and top coat, so now I cant tell the difference between the two. I noticed that one of those coats has a pink/red tint to it when I look at the brush, and the other one is totally clear. Which polish has the reddish tint to it: the base coat or the top coat? Thanks!

    Reply
    • May 17, 2013, 7:49 am Beth

      Hi! One of the previous commenters noted that the base coat has a pinkish brush and the top coat has a clear brush. So it’s the base that looks pinker. Hope that helps!

      Reply
  • May 17, 2013, 4:22 pm Julia

    Thats just what I needed to know! Thanks!!

    Reply
  • May 20, 2013, 12:16 pm Jennifer

    Hi Beth,

    I just tried the Sally Hansen gel polish for the first time and had a strange experience with it. After curing for 60 seconds, the polish still felt tacky to the touch. And, after curing the top coat, using the cleaning wipe gently on each nail stripped the shine and the color entirely in some spots. Can you suggest what I did wrong? The layers may have been slightly thick, but I really did try to keep them thin.

    Reply
    • May 20, 2013, 12:33 pm Beth

      Hmmm, I don’t think it’s the thickness; that would probably just lead to wrinkling in the polish. The tackiness after each coat is totally normal. It isn’t until the final top coat that you wipe away that stickiness. Are you sure you used the top and base coats in the right order? It’s super easy to get them confused since they look so similar. Once I used the base coat by accident as the top coat, and I had a similar thing… it kind of smeared everything when I tried to use the alcohol wipe.

      Let me know if that helps…

      Reply
      • May 25, 2013, 6:45 pm Ana

        How many manicures could you get from one bottle? I found them for about $13 a bottle & am wondering if I can get more than one use out of it.

        Reply
        • May 25, 2013, 7:37 pm Beth

          You can get about 10 manis, I’d say, out of one bottle. I haven’t run out of any colors yet!

          Reply
    • June 5, 2013, 9:01 pm Erin

      it sounds like you were touching your nails between coats which might have caused there to be oil between the polish layers or maybe you forgot to shake the bottles first to thin out the polish? Hope that helps!

      Reply
  • June 14, 2013, 10:36 am Linda Nelson

    Please help! I bought an LED curing machine and I am using the Finger Paint brand of chip-free bonder, under coat, polish and top coat. I cannot find out how many seconds I need to cure them under the LED light! Tried going to the Finger Paints website and it is non-existent! Anyone know how long each step takes with an LED lamp?

    Reply
  • June 14, 2013, 6:42 pm Laura

    Do I even need the base coat? I made a mistake and bought the polish and top coat and led light. As long as I don’t hurt my real nails I may try without base.

    Reply
    • June 14, 2013, 10:13 pm Beth

      I haven’t tried it without the base coat, but having used the system it doesn’t seem like the base is essential. Let us know if you try it!

      Reply
  • June 28, 2013, 12:08 am misun

    Hi! I was hoping you can give me a tip with this kit. I love doing different colors… but I can’t seem to cover the edges well. When I wipe at the end, my edges come off so I have visible bare nails at the edges. I thought I tried really hard to make sure edges were well covered with base but can’t seem to make it stay. Any suggestions on how to keep tips of my nails colored?

    Reply
    • June 28, 2013, 7:27 am Beth

      Hmmm. I haven’t really had this problem. I think more important than the base is the top coat, so maybe try making sure that the tips are covered with top coat? You could also try curing them once upside-down, because it’s possible that the light isn’t getting to the tips. Cure once the regular way, then try curing once with your hands upside down. Those are the only suggestions I can think of… let us know if you figure it out!

      Reply
      • June 28, 2013, 3:09 pm Mi Sun

        Thank you! I think they might be too thick… I realized some part were cured with air pockets… I’m going to test out warming the polish and try to put it on as thin as possible and curing it upside-down! Thank you!

        Reply
  • July 11, 2013, 9:58 am Cheryl G

    I want to thank you so much for your review on this product! I’ve gone into The ‘big box’ stores multiple times, carried the kit around while I shopped & then never taken it home because I just wasn’t sure it would work! I will definitely be buying one now! Thank you thank you thank you!!!

    Reply
    • July 11, 2013, 9:59 am Beth

      You are so welcome, Cheryl!

      Reply
  • July 11, 2013, 6:18 pm Amanda

    Are your nails thin and brittle after removal? Like after you get acrylic nails removed?

    Reply
    • July 11, 2013, 8:09 pm Beth

      Not if you remove them properly, with acetone, instead of peeling them.

      Reply
  • July 18, 2013, 10:13 am chez

    Thnx Beth for this wealth of info. I just learned about this product lastnight while looking thru my new coupons. Every question I had has been answered. Now I know what/what not to do, and feel like I’m ready to take on the gel nail giant. I will go out, buy this product, do my nails, and feel great about my nails. I’m a hairstylist so you know the damage water and chems can have on hands. I used to wear acrylic but my nails were really weakened. I’m so excited about this…will let you know how they turn out. Thanks again;)

    Reply
    • July 18, 2013, 12:02 pm Beth

      You are so welcome! I’m excited for you and your new gel nail adventure! Hope it goes perfectly.

      Reply
  • July 31, 2013, 5:04 pm Lori

    I also love this product and thank you for the tips! It was $65 at Target, but on sale for $15 off. I wish I’d known about the $10 off coupon on the Sally Hansen website since then it would have been $40! The removal is great…I was amazed at how the polish comes off so easily. I also LOVE how you don’t have to wait for it to dry. I haven’t worn polish on my fingernails in YEARS because I don’t have the patience to keep my hands still that long!!! But now I plan to keep them painted most of the time. Do you use the Sally Hansen oils? That is mentioned in the promo video for the kit.

    Reply
    • August 1, 2013, 7:25 am Beth

      I don’t use the oils regularly, no. I think you are talking about the cuticle oils? I’ve used them before and they are good, but I don’t use them consistently. I’ll have to watch the video to see what they say about them.

      Reply
  • August 14, 2013, 7:33 pm Susana

    Thanks for this review. I’m waiting for this kit the post.

    Has anyone tried the instant nail strip gel kit and after using up the strips then tried using an ordinary base coat+ordinary coloured polish, then applying the leftover gel top coat+cure?

    Also, has. anyone tried the LED light on ordinary polish? Does it help to dry it?

    Reply
    • August 15, 2013, 8:56 am Beth

      Hi Susana! For a review of the insta-gel strips, see my link at the top of the post. I have tried using regular polish and the gel base & top coats, and it did NOT work. I plan on doing a post about it. I tried curing the regular polish with the LED light and it didn’t do anything. :-)

      Reply
  • August 15, 2013, 6:42 pm Vickie

    Hi! Is there a trick to using the White Away for a French manicure? It’s the only “white” gel available in the SH gel manicures, and it took 2 coats to get it to even look like a French!! Can I possibly use a regular white polish before applying the White Away on top then curing??

    Reply
    • August 16, 2013, 11:51 am Beth

      I think you might just have to do several coats. I’ve never tried a French mani with the gel kit. I wouldn’t recommend using regular polish, though, because it doesn’t seem to work with the gel. I tried it and ended up with a mess. Maybe look for another brand of gel to see if they have a white?

      Reply
      • August 16, 2013, 7:24 pm Vickie

        Thank you, Beth! I actually read almost all of your comments from above and tried the Red Carpet white gel. It worked fabulously! I love my French gel – just did it tonight! I am a nail tech and am always looking for reliable source to bounce ideas off of as well as get great advice! Will keep you in mind for future questions and tips! So glad I found you! :-)

        Reply
        • August 22, 2013, 5:31 pm Beth

          Thanks, Vickie!

          Reply
  • August 22, 2013, 11:31 am Cheryl DeleZene

    Actually I have a question. I’ve looked at numerous reviews, questions, etc. and one question/answer I’ve been unable to find pertains to colors. I’m not a big color person. My nails grow like weeds and I already have an almost French manicure like natural nail. Can I simply use the base and top clear coats with the same gel results with the at home kit or is the “key” in the nail color bottle? I do use colors for special occasions, but prefer just a clear coat for the most part……………Thanks

    Reply
    • August 22, 2013, 5:31 pm Beth

      I haven’t tried it but I think the “key” is in the top coat. I think you could do only base & top. On the other hand, Shell We Dance is a great neutral, kind of natural looking, and Gelish Mini (small bottles available at beauty supplies like Sally) have a color called “Simple Sheer” which is really just a clear coat. I like using that one when I’m going clear. Hope that helps!

      Reply
  • August 25, 2013, 4:16 pm Jessica

    Hi! I bought the mini starter kit that does one nail at a time. This one didn’t come with a base coat. So I did my nails without it and now they seem to be lifting. Is the base coat sold on its own?

    Reply
    • August 25, 2013, 4:53 pm Beth

      Jessica, I think you bought the nail strips, instead of the liquid polish? It doesn’t come with a base coat but I found that the strips don’t work *nearly* as well as the polish itself. I think the problem is simply that kit doesn’t work that well. But since you have the light now, you can buy the polish separately (base& top come in one package together, color in a separate package) & use the light you have, instead of buying a whole new kit.

      Reply
  • September 14, 2013, 1:02 pm Diane

    Hi… Thanks for your information it’s a huge help! Can you tell me how long it took you to do the manicure and how many colors that kit comes with? I just want to know if I need to buy anything to go with the kit so I can use it right away. Thanks again!

    Reply
    • September 14, 2013, 10:27 pm Beth

      Hi Diane,

      The kit only comes with one color, but you can choose different kits with different colors. Shell We Dance is a really nice neutral & I know it comes in one of the kits. It takes me about an hour to do a manicure, including the 15 minutes of soaking off the previous gel and doing all my cuticles and such. The actual painting and curing takes about 20 – 30 minutes, since you need to do one hand at a time. Hope that helps!

      Reply
  • September 29, 2013, 4:55 pm Teresa

    Bought the kit with Shell we Dance. Color is a little too light and wondering if I could add a couple drops of regular polish to darken the color. Will it cure okay? Has anyone tried this?

    Reply
    • September 29, 2013, 7:23 pm Beth

      I don’t think it will cure. I would get another gel polish and perhaps mix those two.

      Reply
  • December 8, 2013, 3:40 pm Paula

    I was just wondering if anyone has tried the SH insta gel strips on fake nails? Does it work?

    Reply
  • December 12, 2013, 10:04 pm Vivien

    So I have the Sally Hansen gel polish kit and I can’t get it to be as shinny as yours. What am I doing wrong?

    Reply
    • December 17, 2013, 1:16 pm Beth

      Sometimes right after the alcohol it’s not that shiny; I’ll lightly buff them with a soft cloth (or on my pants!) to get the shine. I think sometimes there’s just excess oils or whatever that get spread on the nails when you wipe with alcohol; they shine up in just a few more minutes.

      Reply
  • December 17, 2013, 11:25 am Camryn

    Have you tried using other brands of shellac colors with the base and top coats and the LED light? If so, how well does it work?

    Reply
    • December 17, 2013, 1:14 pm Beth

      Yes, I have used other brands; I had some issues at first but now it works quite well. I like using Gelish (you can buy the “minis” at beauty supplies), Sensationail, and Red Carpet.

      Reply
  • December 26, 2013, 11:52 am Shelby

    Can I use the base coat and the top coat of the sally Hansen gel polish, and use BMC 6pc Set UV/LED Gel Lacquer Nail Art Polish Manicure Collection-Color or other brand of gel nail art polish (of the color coat) on my nails?
    Thanks

    Reply
    • December 26, 2013, 12:26 pm Beth

      Yes, you can use other brands’ colors. I’ve never heard of the one you mention, but I’ve used 3 different brands and they all work fine.

      Reply
  • December 29, 2013, 2:43 pm JessicaJ

    FYI…I just received the Kiss Gel Kit and LED Light and have been playing with it since. I have managed to use the gel polish (Kiss’ Lush) and used regular polish on top of it to accent the solid gel color. For example, I have used Sinful Colors Tinsel and Shine glitter polish as a French manicure tip color, then let it dry about 5 minutes, applied the gel top coat and put it under the lights for a full minute and it worked fine. I wish I could attach a photo but I can’t here. :-/ I have also tried using one of the Sally Hansen Real Nail Polish Strips on one nail, no bottom coat, but I did apply the gel top coat and dried under the lights and it too is holding up wonderfully! I am hard on my hands, doing dishes a couple times a day, using cleansers, etc. and still no chipping…which for me have a polish last more than one day with out chipping is a mirical! This stuff is amazing! Also, you can buy the colors, cleanser, top and bottom coats on EBay.

    Reply
    • December 29, 2013, 3:38 pm Beth

      Thanks, Jessica, for all this info!

      Reply
  • December 29, 2013, 4:59 pm pam

    I just bought the sally Henson system. It was easy and I like it but don’t love the choice of colors. Can I use the sally Henson base and too coat with opi gelcolor?

    Reply
    • December 29, 2013, 8:55 pm Beth

      Yes, you can use the system with any other brand gel color. Scroll up through the comments for some suggestions for other brands.

      Reply
  • April 11, 2014, 9:02 pm Shannon Taylor

    Hi! Have you ever tried lengthening the tips of your nails with this kit? i like my nails a little longer (not to long) but i’m wondering if it’s possible with a home kit.
    Love this review! Can’t wait to try this kit

    Reply
    • April 13, 2014, 12:51 pm Beth

      No, I haven’t tried that… I’m not even sure how you do that? Let us know if you try it!

      Reply
  • April 27, 2014, 5:34 pm Elizabeth

    Hello I love all your feedback and thinking of buying the kit. I was wondering what happens when the led lights burn out.

    Reply
    • April 27, 2014, 5:47 pm Beth

      Good question… I don’t really know. But LEDs are supposed to last about 10 years, I think, so I’m hoping by that time I’ll have a new obsession! ;-)

      Reply
  • May 9, 2014, 4:56 pm Eden

    Great kit for sure :-) I have short nails, so I apply tips, & get great results. Am about to try with another brands color!

    Reply
  • August 21, 2014, 4:59 pm Amy

    I bought one of these kits second hand and it came with 5 bottles and no instructions, no one seems to have any suggestions as to what the other 2 bottles are and they are not polishes..one is clear and the other is a milky color any idea what those 2 would be?

    Reply
  • November 20, 2014, 9:04 am tammy

    I LOVE this product!!!!!! But, sadly, ever since I started using it I have had a reaction to one of the products. My lips are severely chapped, and raw. Have you ever heard of this? I don’t want to stop polishing my nails because they look gorgeous. Could it be the light or the bottles of polish/primer? Please help!!

    Reply
  • December 3, 2014, 3:29 pm Cathie Soliz

    I just want you to know I love you gel polish. I have polished my
    nails for 40 years every weekend and now every 2-3 weeks and
    it stays on as beautiful as the first day I polished them.. At my age
    60 I cant find a lot of selection for my age.. I don’t go for the new
    wild colors. but what I did find is great but I been wearing the same
    color for months now, just wanted to change them up a little..
    I love your polish…

    Reply
  • May 13, 2015, 1:29 pm tabatha

    Hi I’ve bought the Sally Hanson and used it before and it chipped right after the third day I just used it three days ago and all my nails are staying on except my two pointer ffingers that I use the most I’m having an issue doing the same keeping it on can u help please ?

    Reply
    • May 13, 2015, 7:35 pm Beth

      Hi Tabatha… I’d say maybe try to make sure that you really cover the tips of your nails with the top coat so that there aren’t any cracks that can create a chip. You could also put on another top coat and cure it a day or two after your manicure.

      Reply
  • September 16, 2015, 1:00 pm karen colvin

    nail jel turns dark when you put sun screen on hands. looks like the tips of my nails are burnt. I tried two different kinds of sunscreens.

    Reply
  • August 4, 2016, 8:32 am Ellen

    The cotton round trick is great! Much better than trying to balance a soaked cotton ball on my nail as I clumsily wrap foil.

    Reply