


So, I promised yesterday when I showed you my new craft set-up addition that I’d show you inside the drawers today. Look at me, keeping my first blog promise in the New Year. I’m a new woman.
The drawer unit I bought has 5 drawers, and I organized them to work fairly efficiently, although I always feel I fall a bit short. There’s often something that there’s simply too much of, and I have to store it in two different places, and then how to break into two categories, what’s the distinction between what’s stored in the plastic bin and what’s in the desk drawer? And you don’t want to completely undo what you have that works… mo’ craft supplies, mo’ problems, I tell ya.
Anyhoo. Back to the drawers. Here’s my top drawer:

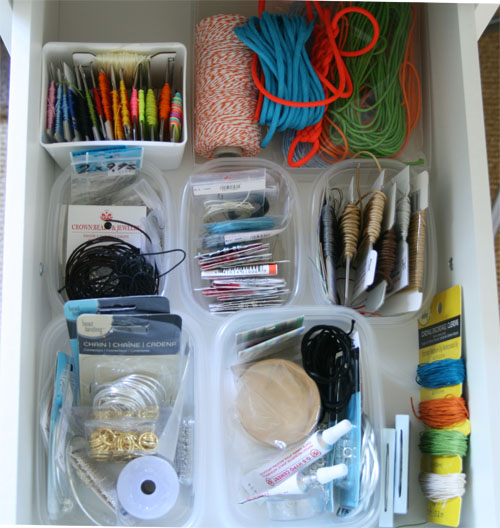
This is what I’m calling the “tool drawer,” for lack of a better term. It’s mostly tools. From the front of the drawer (the bottom of the photo), you’ve got the rotary cutter and blades, my handy Martha Stewart Utility Bone Folder (hiding under the rotary cutter), which is a cool tool that’s kind of a cross between a bone folder and a crafty Swiss army knife. It has tweezers and a craft knife and an embossing tool all tucked in it’s sleek little body. Just like me!
OK, so also my date stamp for my Smash book and washi tape. To the right, there’s my Martha Stewart screw hole punch (LOVE this tool, and couldn’t do without it), craft scissors and a heart hole punch.
Behind all this stuff is mainly myriad adhesives. Glue tape runners, double-sided tape, old scrapbooking adhesives, pop dots, photo corners, glue dots… good grief, I didn’t even realize how many ways there were to adhere one thing to another. Wait ’til we get to the glue drawer!
Now, I will say that I think I came up with a pretty ingenious way to organize everything without spending more money on drawer dividers. I already had a bunch of small little containers, some for drawers, others just collected from various things. I fit some in the drawers in the sizes I needed. But of course, they don’t fit snugly, so every time you opened the drawer, they would slide backwards and dislodge everything. I have some museum putty, which here in southern California is used for earthquaking things, so I simply put some putty on the bottom of each container and affixed it where I wanted it. It’s removable and non-marking, so when I want to reorganize it’ll be easier than using a more permanent adhesive, but it keeps everything in place and works great.
The next drawer I didn’t photograph because it’s simply an “electric tools” drawer, with my heat gun, glue gun, and label maker.
Here’s the third drawer:
Here I’ve really made the most of the cheap organizers and museum putty concept; I just used some of those inexpensive tupperware-type containers you can get at the grocery store or Target. This is sort of the cord/jewelry making drawer, although here’s where I get a little twitchy because I have a whole other area of jewelry making supplies, so what’s the difference here? Well, all the macrame cords are in here, but other than that it’s kind of things-I’ve-been-thinking-about-working-on, which isn’t a very strong organizing concept, but at some point I had to give up. In this drawer you’ll see various rings, jewelry cement, beading cord and macrame and Chinese knotting cord, Korean knotting cord, hemp cord, yadda yadda. Maybe soon I’ll actually make something with this stuff!
Next up, the pen drawer:
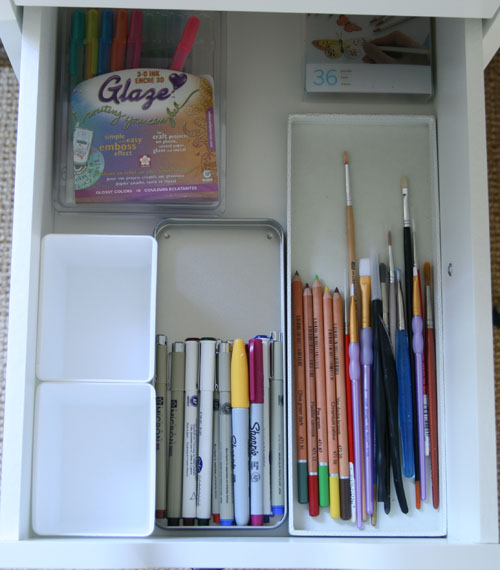
Now, you’ll notice the pen drawer is a little empty. I put all my Microns from back in the scrapbooking days and a few Sharpies in here, along with some pencils and craft brushes. I’ve got a few packages of pens in the back there. And some empty containers. I’m still trying to figure out if I should consolidate ALL my pens from everywhere (there are a lot of them) into this one drawer, if they will all fit, what makes sense, etc. So stay tuned on this one.
Finally, the bottom drawer is kind of a catch-all, but could reasonably be named the glue drawer:
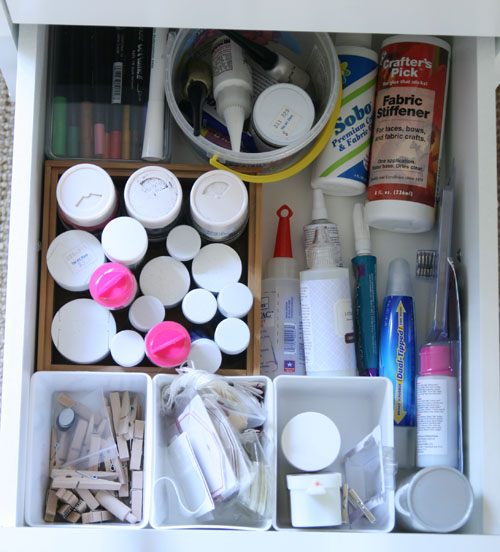
So, there’s a lot of glues. But those white circles are the tops of jars of glitter, so there’s a lot of glitter, too, I suppose. And other random things like the tiny clothespins (I’m a TOTAL sucker for tiny clothespins), tags, magnets, and even a box of old scrapbooking markers that I haven’t used in about 7 years. Maybe I should get rid of those? I didn’t put them in the pen drawer precisely because I haven’t used them in so long. They’re probably all dried out.
Those are my new supply drawers! Since I’m showing you all this stuff, it’s probably worth showing you the other areas of my craft set-up. So that’ll be coming later this week, if I can get it all vacuumed and presentable, you know.
Have a very organized day.


Okay, so this isn’t the point, but I have long been noticing that lots of folks I admire are washi tape fans. But what does one do with these admittedly lovely tapes?
And as to the point at hand: beautifully organized!!