I’m happy to be sharing this sponsored post with you today about making a fun Halloween candle scape!

Halloweencandles10

The people at Scented Candle Shop sent me some fun candles to mess around with to make a Halloween display. My favorite is probably the candy corn-scented votives, but we’ll get to that in a moment!

With just some simple candles, you can make your own spooky candle arrangement without relying on what the industrial Halloween complex thinks is festive. I got some tapers in black, white and red, a few white pillars, some floating red candles, and some scented votives. The votives were Halloween-themed, in “Candy Corn” and “Witches’ Brew” flavors.

I started by putting some black burlap/gauze stuff across the mantel. I found this stuff at Party City.

Halloweencandles1

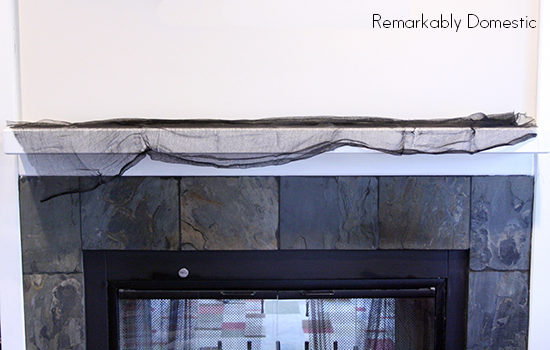
I attached it with some Quake Hold-type putty. I wanted mine to look uneven and raggedy.

Next, I put up some spider webs, also from Party City, but during Halloween season you can practically find these anywhere.

Halloweencandles2
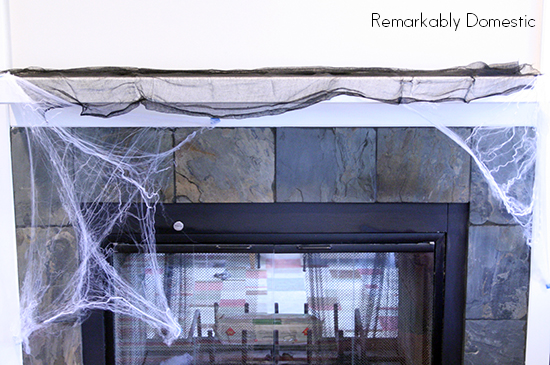
Nice! Now we’ve got the canvas on which to put the candle display. I gathered a few things in addition to the candles:

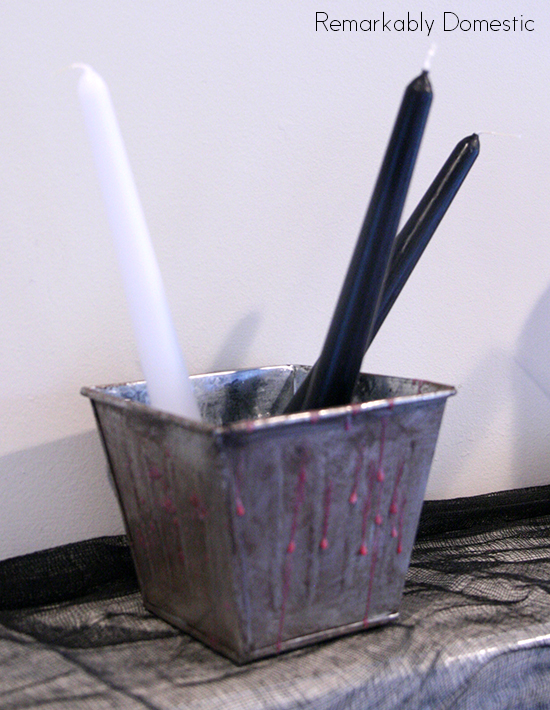
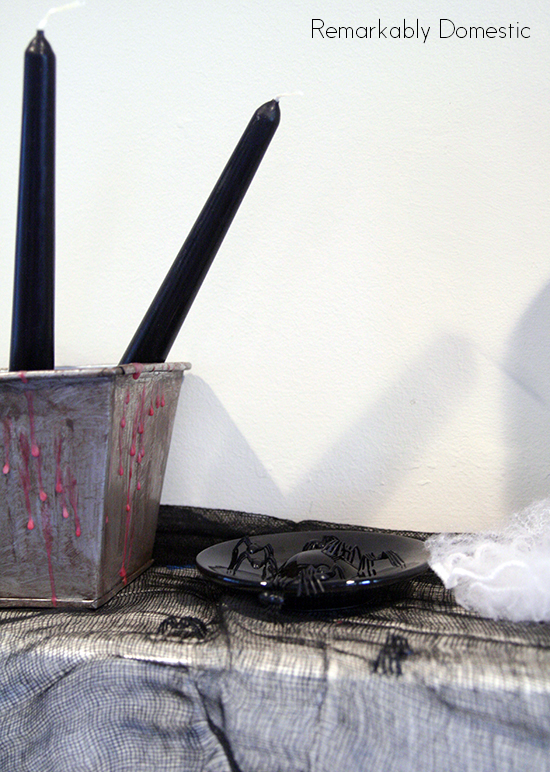
  • a galvanized bucket, which I painted with brown paint and then wiped off to give it a dirty look, and then dripped red candle wax on for a bloody effect.
  • 3 small glass cups with water and food coloring inside. Two of them had red food coloring for a blood effect, and one had black food coloring. Spooky.
  • a small black saucer
  • some plastic spiders
  • a small vase with an opening large enough for a candle
  • sand
  • a small, flat, black tray

In the galvanized bucket I added sand so that I could stand the tapers up in awkward angles. I put several tapers in, letting them lean like they had fallen and were in disrepair.

Halloweencandles7

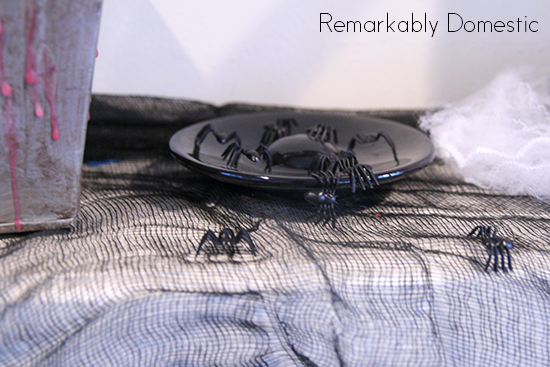
You can see my bloody, dirty galvanized bucket there, too. Now, since the candles are leaning, there’s one candle that could conceivably drip wax onto the mantle. To solve that problem, I added a small black saucer underneath the wick. In the saucer I placed several plastic spiders, spilling out onto the mantle.

Halloweencandles8So you get this effect, and safety, too:

Halloweencandles6
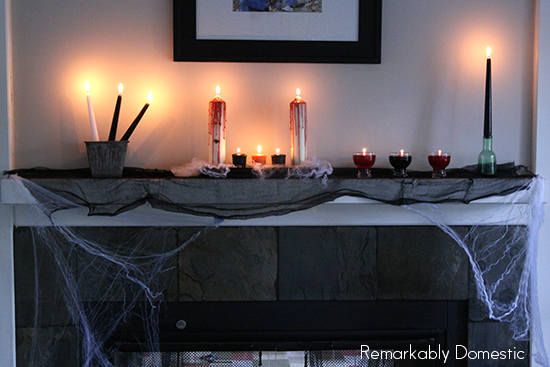
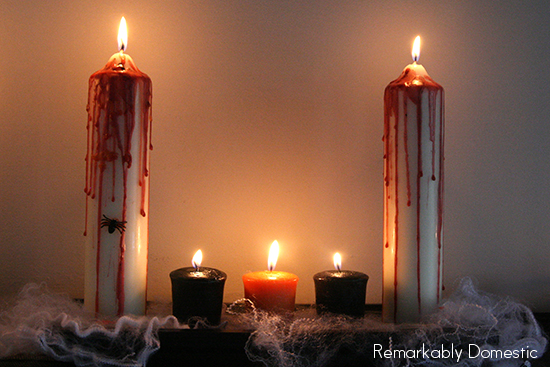
The centerpiece was the black tray with several candles on it. First, I lined the tray with more spider webbing. Then, I took two white pillars and dripped melted red wax onto them, so they seem to be bleeding (search “bloody candles” and you will find tons of tutorials online). One caveat: make sure you use solid red candles for the best pigmentation. In between these two tapers I put several small votives, the ones with Halloween smells like Candy Corn and Witches’ Brew. Another note, here: Candy Corn smells nice and sweet. Witches’ Brew is very spicy, so if you have anyone who is sensitive to smells in your household, I’d skip that one and go with something unscented.

Halloweencandles5In order to make sure that your tapers don’t fall over, secure them with more Quake Hold putty. You might also want to add, as I did, a small piece of wax paper underneath these candles, so the hot wax drips onto the paper and not onto the spider webs.

Halloweencandles3In the cups with colored water I placed the red floating candles. And to finish it all off, I added a black taper in a bud vase.

Halloweencandles4

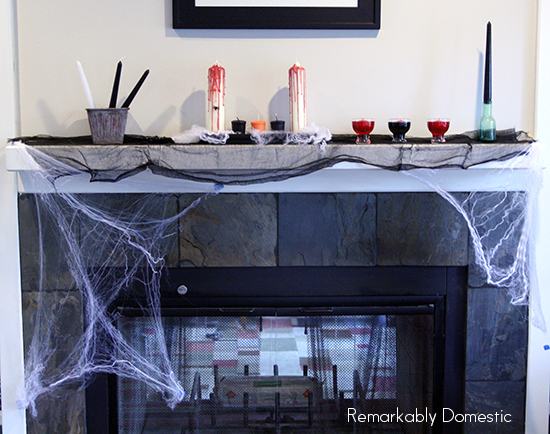
The whole display looked like this:

Halloweencandles9
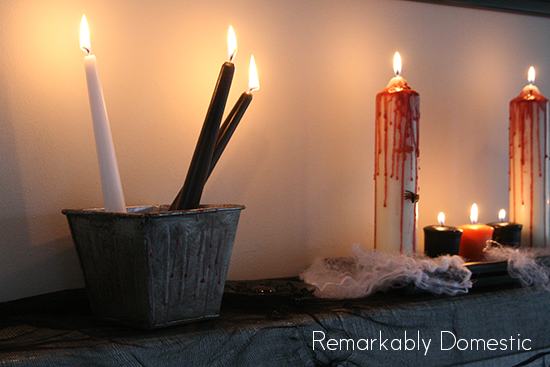
And when it was lit?

Halloweencandles10

Halloweencandles12

Halloweencandles14

Halloweencandles13Hope you enjoyed! Happy Halloween to all!

{ 0 comments }

Winnah, winnah, chicken dinnah!

I’m here to announce the winner of the $50 American Express gift card, which was chosen by random number generator.

Screen Shot 2013-10-11 at 2.01.00 PMAnd the winner is… Lisa Brown! Congrats, Lisa. I’ll be contacting you with more info.

I’ve been planning Halloween costumes for a few weeks now, and we’ve finally nailed down what the kids want to be. Let’s play a fun game, yeah? I’ll show you a little of what I bought today for their costumes, and you try to guess what they want to be. Keep in mind they are 10- and 7-year-old boys.

For the 7 year old:

halloweenplansThat contact cement required that I show an ID to the cashier. What the?

For the 10 year old:

halloweenplans2These are not all the supplies, mind you. Just a few that I bought today.

Any guesses? C’mon, it’s fun!

{ 8 comments }

Just checking in for a brief… debrief on Halloween.  It was all Mario Brothers up in here.

First, the 8 year old wanted to go as Luigi.  No problem, since I made the 5 year old a Mario costume when he was 3.  Except the pattern I had was for toddlers.  The 8 year old is over 4 1/2 feet tall, so I had to adapt the pattern for his height.  Thankfully, he is also super skinny so I actually kept the width of the overalls since Luigi is tall and thin.  It worked really well.  I made a hat out of felt with this tutorial, which is super simple.  His friend was going as Mario, so it all worked out lovely.

The moustache is made out of thin foam, and I think it creeped the 8 year old out enough that he wouldn’t move his mouth.  He was talking like he’d just had his wisdom teeth removed.

When the team paired up, they were unstoppable.

Now, the 5 year old had to make things super complicated.  He wanted to be Bowser Jr.  What, you don’t know who Bowser Jr is?  Clearly, you don’t play enough Super Mario Brothers.

Bowser Jr is a “Koopaling,” which means he is a child of the main villain, King of the Koopas, Bowser.  There are 8 Koopalings, and Bowser Jr is both the youngest and the favorite.  And the heir to the throne.  How do I know all this, you ask?  The interwebs, silly.

So, he looks like this:

No, I am not kidding you.

We managed to get a yellow footed sleeper in the 5 year old’s size and then we went to work on the shell.  The 5 year old, to his credit, did help me make it.  We had a fun little exchange during the process.  I was hot gluing things together, and he was watching intently when he suddenly asked:

“Mommy, what are you going to BE when you grow up?”

I paused for a moment to regroup.  ”Well, honey, I’m already grown up.”

He barely thought a second and replied, “NO, I mean like, when you’re like grandma and grandpa.”

I said, “Well, when I’m like grandma and grandpa, honey, I’ll probably be a grandma.”

Exasperated, he sighed and said, “NO, I MEAN, like, what’s your JOB?”

That’s when I started laughing, but he didn’t seem to think it was funny.  I explained to him that I used to have a job teaching, but now my job is writing and taking care of him, yadda yadda, here’s me trying to justify my existence to the 5 year old.  What was most hilarious to me was what I perceived as his thought process.  It seemed clear that as he was watching me hot glue, he was thinking, “Hmmm.  I’m not sure this hot gluing thing is a marketable skill.  I wonder where she’s going with this?”

He’s always got my back.

And I’ve got his, because I produced the following Koopa shell for it:

That’s him without his mask on, since preschool does not allow masks for Halloween.

When we were ready for trick or treating, though, we went all out: Bowser Jr put on his mask and Luigi sprayed his blond hair black.

We collected enough candy that each child’s bucket was essentially overflowing.  Pieces of candy were falling out as we walked down the street.  That’s when we knew it was time to be done.

I hope you had a fantastic Halloween and that you don’t get any stomachaches from all the candy.  I’ve already pilfered an Almond Joy, a Snickers and two mini Milky Ways.

{ 5 comments }

Funny thing is, although the name of this craft is a mouthful, it really couldn’t be easier.

A while back I demonstrated one of my favorite t-shirt designing techniques using sandpaper and regular old crayons.  Here’s the whole trick: you draw on sandpaper with crayons, and then you iron the sandpaper onto a shirt.  Your image transfers, and it turns out looking super cool because the sandpaper gives it a kind of pebbly texture.  Believe it or not, regular crayons work great—although well-pigmented ones, like Crayolas, work best—and the shirts wash (in cold water) fine and keep their color well.

So, all you need for this craft is:

  • coarse grain sandpaper (I usually use 60 grit)
  • crayons
  • a t-shirt
  • an iron
  • a rag
  • a piece of cardboard

Give your little one a piece of sandpaper and some crayons, and let him or her get to it!  They can draw whatever they want.

A few tips to keep in mind:

  • Darker color crayons work better.  For the pumpkin, for example, I recommend Sunset Orange or Scarlet, instead of regular Orange or a lighter orange.
  • Stay away from text.  If you are thinking of doing text, make sure it’s done mirror image.  For an adult this is more easily accomplished than for a kid, so I usually just avoid text.
  • Do keep in mind, though, that your design will come out on your shirt as a mirror image, in case you have anything special in your drawing that needs a particular orientation.
  • Press relatively hard and go over your lines and shading.  You want to actually leave bits of the crayon on the sandpaper, which will in turn melt into the shirt.  Don’t be afraid to really work some crayon into the grain.
  • Brush off the blank spots.  You’ll inevitably end up with some stray pieces of crayon that have jumped to other parts of the sandpaper.  If you don’t brush them off, you’ll end up with some little dots all around the shirt.  Not a huge problem, but you might not want excess marks on your shirt.
  • Keep in mind that you may use up a half a crayon drawing on the sandpaper; you will almost certainly need to peel it, and you may even get halfway down.

When the design is finished, it’ll look like this:

If you’re lucky, you’ll have a sweet little face like this to boot.

To iron the design on, you’ll need to put a piece of cardboard in between the layers of shirt, so that your image doesn’t transfer all the way through.  Place the sandpaper crayon-side down on your t-shirt.  Then, put a rag over the sandpaper to iron—otherwise the grit can come through the back of the paper and scratch your iron, so you want something there protecting it.  Iron on high heat for about 30 seconds or so; you can check the image carefully by peeling up the sandpaper.  If it hasn’t transferred enough, simply replace it and iron some more.

When you’re done, peel the paper off and your t-shirt is ready!  You may want to wash it before wearing, since the texture of the sandpaper kind of embeds itself in the shirt until it’s washed.  (The 5 year old claimed it was “scratchy” until it got washed.)

He’s pensive, showing off his design.

Have you ever done crayon transfer t-shirts?  They’re super fun.  Try it out!

I’m linking up to some fun craft round ups!  Check out some fun stuff at Crazy Cute . Skip To My Lou and…

Somewhat Simple

{ 5 comments }