As you’ll all recall, I’ve been delighted to be designing a study space for the newly-turned 6 year old over the past few weeks. I’m so excited to share my space with you today!

I designed this study space for my kindergartener, so the main thing I wanted was a stimulating, fun area whose tools and supplies were easy to access. Obviously, there isn’t a lot of studying going on in kindergarten; as a parent, what I really want to do with this area is create habits and cultivate a positive attitude. I want the study space to be a place where my son wants to go, a place where he feels comfortable and happy and has everything he needs in front of him.
My other philosophy here and in general is attention to detail. I love seeing a space with lots of little design choices that keep surprising you. Charles Eames once said, “The details are not the details. They make the design.” I think that’s how I work, in general; my overall theme is often simply attention to detail.
Let’s check out the space!

The focal point here is the grouping I created over the desk. I showed you how I matted and framed the robot prints here; I hung them at the top and then added the magnetic clip board lower so that the 6 year old can reach it to place things on it. Since we live in earthquake country, I earthquaked them all; that’s Southern Californian for “attached velcro strips to the bottoms of the frame and the wall to secure the pictures.” Even if you don’t live in a seismic zone, it’s worth it to secure anything you are hanging over a kid’s desk. I used Command strip fasteners, which are precut.
To round out the group, I added these cute little surfboard signs that the 6 year old got from his cousins. It’s a special gift that reminds him of an amazing day we had this summer with a bunch of cousins all converging on our house.

On the desk itself, the hedgehog bookends hold a few key books; for now, it’s just the junior dictionary and our nightly classic story book. As he grows, though, that space will keep other reference books, like a thesaurus or a language dictionary (the 9 year old had to get his first Spanish-English dictionary for school this year). The rocketship is something he made with me, and the colors were so perfect it made the cut from old space to new.

I filled the lazy susan with all the tools he needs to do homework and “projects,” which he is always creating. He loves to make books and games and various other drawings and such, so I included markers, colored pencils, crayons, regular pencils (some mechanical and some regular), and key tools: scissors, a ruler, and a glue stick. Because I didn’t want the pencils or crayons to mark up the inside of the lazy susan (I’m neurotic like that), and also to prevent the hard surface of the wood from dulling or breaking the pencils, I lined each compartment with padded drawer liner that I cut to size. And, in order to keep the crayons high enough so the colors can be seen easily, I added some tissue paper, scrunched into a little ball, to prop them up a bit.

I made him a desk blotter that is just the right size and matches the mats in the frames above. I’ll do a quick tutorial on how to make it later this week. The blotter adds some color to the desk and also protects it from pencil scratches.

I wanted him to have a place in his room to hang his backpack, and I wanted it close to his desk. I bought one of those handbag hooks–you know, the ones you carry around in your purse so that when you go out to dinner you can hook it over the edge of your table and not have to set your purse on the floor. Unfortunately, though, they were all super girly. I bought the least offensive one, which was simply a flat square with something about “fashionista” on it, and I covered it with 4 Ninjago stickers, one to represent each of the 4 Ninja. (Sorry, Lloyd, you weren’t included.)

Since most of the tools the 6 year old needs are on top of the desk, we didn’t do too much with the drawers. One thing that needed attention, though, were all the cards that have no home. Pokémon cards, Ninjago cards, Skylander cards… they all just lay around the house because we have no system for storing them. Ha! Now I have a place and a system in the top drawer of his desk.

This little organizer has 9 different compartments that fit cards perfectly. I had one other desk organizer that I put a few other essentials in, like a pencil sharpener, some Japanese erasers (!), Post-Its, tissues, and of course, a few finger lights. You gotta have finger lights.
The two storage boxes currently house old preschool art projects. The larger one is perfect for that. We are going to go through it periodically and purge; I’ll probably have another post on that process in the future.

He loves the space. I’ll probably add a cushion to the chair at some point, since he’s a little small for it, but I haven’t gotten around to finding the right fabric and making the thing. It’s good to have something to work towards, no?

So, that’s my A+ study space. Let me know what grade you’d give it. And I’ll be sure to let you know when voting opens up for this challenge! Stay tuned.
Also, some government agency with an acronym I can’t remember wants me to tell you that I received all the furniture and accessories from Pottery Barn Kids for free, although I didn’t get paid to write this post or participate in the challenge. And don’t forget, if I win enough votes, one of you will get a duplicate set of furniture in a giveaway right here.


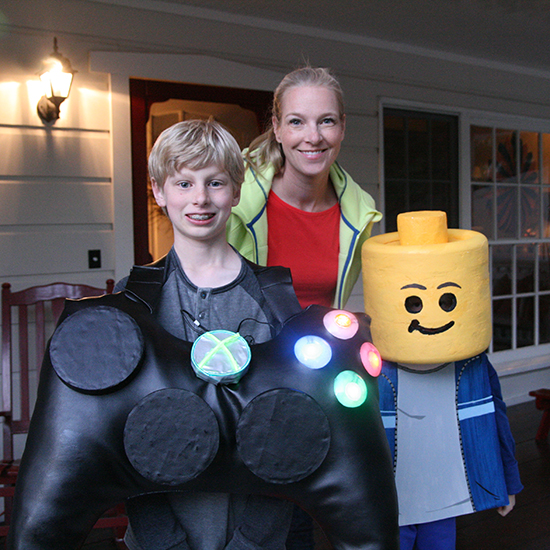 Here we are, completed costumes and all, ready to trick or treat!
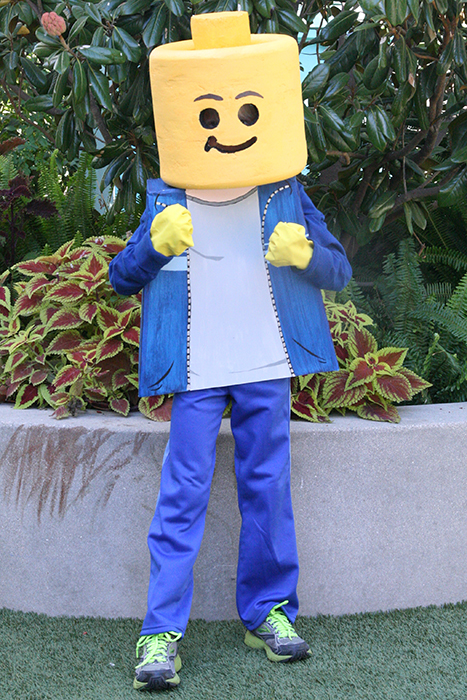 That’s the Lego boy at school. That shirt is an exact replica (perhaps “exact” is a little strong) of the Lego torso that he uses as himself when he puts himself into his Lego play.
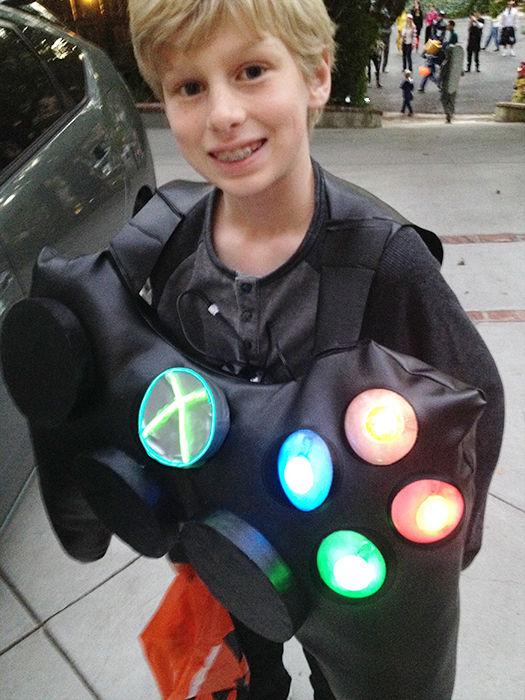 Here you get a better sense of the light up nature of the Xbox controller. The 10 year old liked it, too, because he had these little on and off switches that turned the X on, or set it to blink, or whatever.
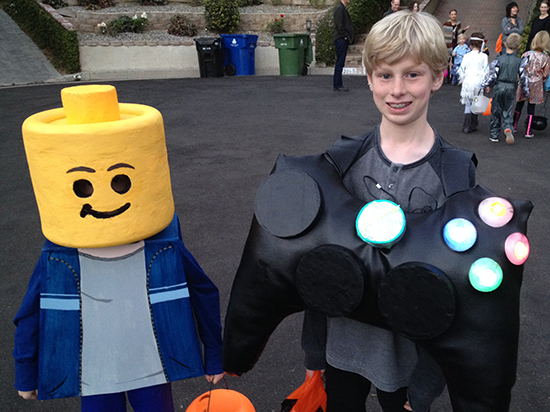 Wires showing a bit here, on the Xbox. Ah, well.
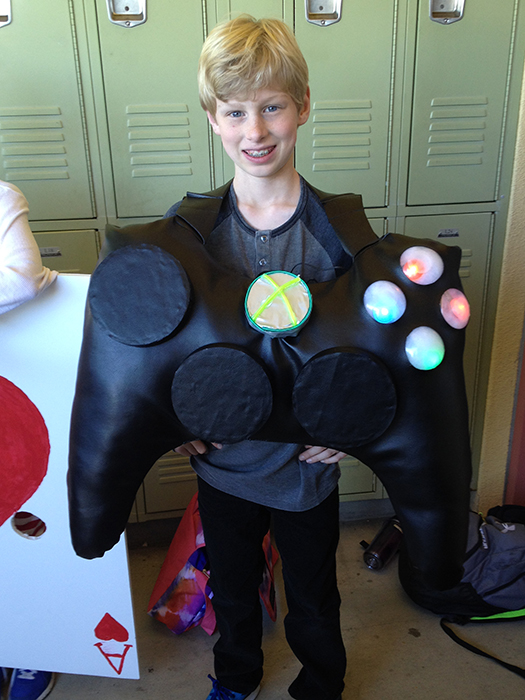 That’s the Xbox at school. He was a little annoyed because so many people came up to him and tried to “play” him, punching his light up buttons.
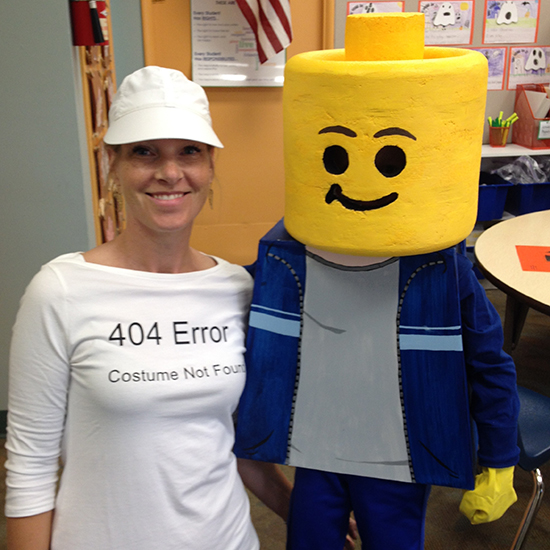 That’s me and the Lego at school. I made my costume the night before; not very original but simple and easy to move around!


