Signature Piece Challenge!

BEarthBoardHave you decided what you are wearing for Thanksgiving?

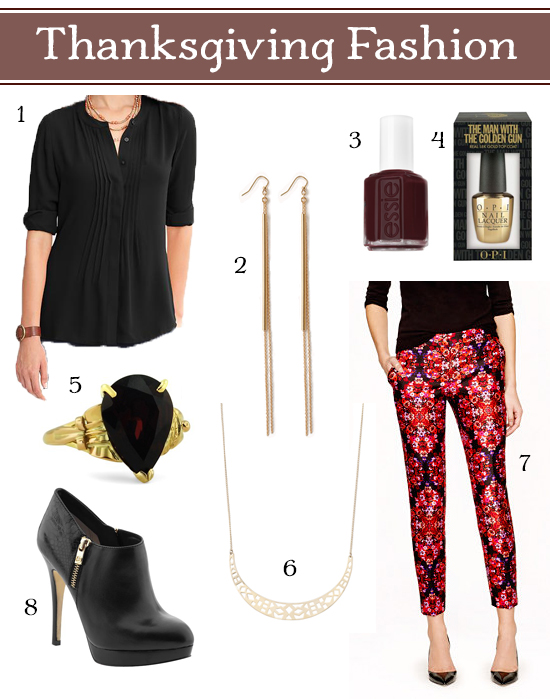
I was recently invited to participate in the Brilliant Earth Signature Piece Challenge, building a mood board featuring one of their gorgeous cocktail rings. I decided to put together my dream Thanksgiving outfit, and as a centerpiece I chose their Daliya ring (#5 above, natch). I love the deep red of the garnet, and the intricate gold work on the sides of the ring is really unique. I love the vintage style.

To go with it, I pulled together these items:

1. Pintuck Crepe Blouse from Banana Republic: It’s kind of casual, kind of dressy; it’s comfortable but looks pulled together.

2. Sleek Linear Drop Earrings from Forever 21: They are simple but striking but won’t take away attention from the gorge cocktail ring. And you cannot beat the price at less than $5! (If you want to make your own version, check out my tutorial!)

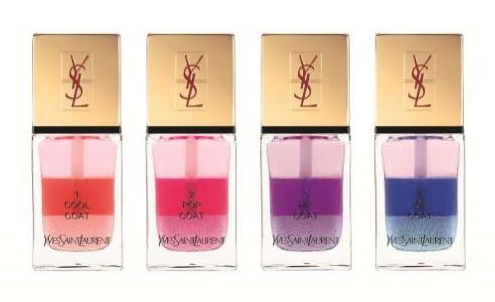
3 & 4. For your nails, try using an oxblood base color and a gold-flecked top coat. I am fully doing this for Thanksgiving, and I’ll keep you updated. Try Essie’s Lacy Not Racy with OPI’s The Man with the Golden Gun top coat, which has real 18K gold flecks. Fancy!

5. Brilliant Earth’s Daliya ring!

6. Stella & Dot’s Avalon Crescent Necklace: I wear a lot of Stella & Dot stuff; their designs are beautiful and their prices are totally reasonable. I love this necklace to go with the cocktail ring because it’s a little bit art deco, a little bit modern, but simple.

7. Collection Cafe Capri in Berry Bouquet Shantung from J. Crew: How gorge are these pants? I love the pattern and the gem colors.

8. York Bootie by MICHAEL Michael Kors: You gotta have a bootie, right? Also, for the fall weather, wearing a substantial shoe keeps my feet warm!

So, what do you think? What would you wear for your dream fashion Thanksgiving?

{ 2 comments }

DIY Grommet ShoesEver find a pair of shoes like, so cheap, but they kind of just need a little something else but you have to get them because they are just so cheap? That’s what happened with me and these pewter Calvin Klein shoes. I found them and they were really inexpensive, and I thought, “Meh, they are a great color, kinda boring, but for $15 how can I not buy them?”

So I did, and then I decided I wanted to spice them up. And for some reason, grommets were my answer. But I kind of love the way they turned out, and it was really quite simple. So if you have an old or a new pair that you want to embellish, here’s how to do it!

grommetsuppliesYou will need:

  1. hole punch (you may remember that I love my Martha Stewart one)
  2. a rubber ball (you really only need this if you have a screw hole punch like mine)
  3. grommets in the size or sizes you want
  4. a grommet tool, preferable a squeeze tool like this Crop-A-Dile
  5. shoes, obvy

To start, figure out where you want to place your grommets.  Then, holding the grommet in place, trace the interior circle of the grommet onto your shoes with a regular pen. (Don’t use a permanent marker in case you change your mind!)

grommet1


grommet2

Once you’ve got your placement on the shoe, it’s time to punch a hole. If you are using a screw punch, which you normally need to use on a self-healing mat, you’ll need something to punch on. I used a small rubber ball, since it fit nicely in the tip of the shoe and provided a cushiony surface for the punch. (The benefit to using a screw punch is that you can punch wherever you want; you don’t need to fit the jaws of a squeeze punch over the edge of the shoe.)

grommet3

My hole punch wasn’t quite big enough for the grommets I chose, so I had to punch a few times around to make the hole big enough.

grommet4


grommet5

Insert your grommet with the top going into the shoe, and the bottom on the underside.

grommet6Then, use your grommet tool to crimp the grommet in place. I like to use a squeezing tool because it doesn’t require that you hammer part of the grommet, which can be difficult when you are working inside a shoe.

grommet7


grommet8

Complete the same process for any other grommets you want to attach, and then do the other shoe!

grommet9

It’s really simple but also looks unique, and it looks harder than it really is. So you can impress your friends with your mad DIY skillz.

grommet11


{ 2 comments }

As you may already know, I love my Sally Hansen Gel Nail Polish System. One question that comes up often with gel nails is whether you can use regular polish with the base and top gel coats. I was wondering about it, too, so I decided to do some experimenting.

To cut to the chase, you can use regular polish if you do it correctly, but it’s not quite as awesome as using a gel polish. Let me explain.

First, I tried using the gel base coat, then 2 coats of regular polish, and then the gel top coat. News flash: THIS DID NOT WORK AT ALL. The LED light doesn’t dry the regular polish, and then once the top coat cures and you wipe it, it ends up a crazy mess.

It does work, though, as a reader suggested, if you put on your regular polish and let it dry completely, and then put a base and top coat of gel over the regular polish. It’s kind of like protecting your regular manicure with a layer of secure gel. Paint your nails and let them dry THOROUGHLY before you start in on the gel. I actually let mine dry overnight before I did the gel. And even so, my results weren’t completely as I wanted.

I got some of the wrinkling that we’ve seen before on both my thumbs. I’m not sure why it was localized to my thumbs or if that was just a coincidence. It’s really hard to show the wrinkling in a photo, but here’s my best shot:

gelregpolishSee how there’s that wrinkle in there? It’s small and relatively subtle but not perfect, so it bugged.

This pic was taken about a week into the manicure. It held pretty well but you can see in the corner that I am getting some lifting that I don’t usually get with the gel color (unless I peel it, of course!).

The other part of using the regular polish is that the removal is slightly more difficult. Or perhaps not difficult, just not as clean. It worked better than I expected, but when I removed the polish the traditional gel way (by wrapping my fingers with the acetone and foil), I ended up with a kind of sticky film from the regular polish. I was able to brush it away carefully but sometimes it stuck to my finger and it took some fussing to get it off. The trick is to really let the acetone sit a full 12 – 15 minutes, because if you take it off before the dissolving is completely done it’s an even bigger mess.

So, my final word on this is: you can do a gel manicure with regular colored polish, but it’s not recommended. I probably won’t do it again unless I find some FABULOUS color that I can’t get in the gel polish that I must have.

As a side note, I wanted to try this new YSL regular polish that I saw, so I bought some and used it for this experiment. It was disappointing! The polish is the Tie & Dye Polish:

ysl


It looks so cool, and the name is awesome. I thought it was going to be kind of like tie dye or something similarly cool. The look of the product, too, made me think that maybe you could use the middle color layer as a base and then shake it up to get the sparkly-ness. Not so much.

It’s basically a really light, sheer, sparkle coat. Using it alone isn’t really advised because it’s so sheer. I used it with a light pink (something like Essie’s Ballet Slippers, I think), and I wasn’t all that impressed. I bought Pop Coat, which is the pink one, and it was so subtle that it wasn’t worth the $25 or whatever ridiculous amount I shelled out for it.

So, there you go… an impromptu review of the YSL product along with my thoughts on using the gel system with regular polish. Let us know in the comments if you’ve had other experiences using the gel system with a regular color polish!

{ 9 comments }

I’m serious! 30 seconds!

I wanted to share with you my new favorite “beauty” product. Now, I have to admit, I’m a little terrified here because I am about to bare myself to you. Not my soul, mind you.

My legs.

bare legs

Ugh. There they are, not Photoshopped or anything and you can see they have quite a few… blemishes.

I am not a spring chicken anymore, people, and my legs have seen some serious mileage. Two kids and a lifetime of clumsiness has left my legs rather scarred and uneven. That’s why, as I’ve told my husband before, I don’t wear shorts. It’s a pretty hard and fast rule.

I will, however, sometimes wear skorts, if they are long enough and I feel relatively comfortable in them. But I still have the problem of not being able to Photoshop my legs in real life. Can someone get on that, please? I guess it’s called “cosmetic procedure” IRL. Whatevs.

legmakeup2

You didn’t believe me with the wide shot, did you? Here’s a close up. Try to keep your lunch down while you peruse the myriad veins, moles, and random residual bruises.

When I came across this “leg makeup” nonsense from Sally Hansen, I was at least intrigued. But I figured it would kind of suck.

legmakeup6

It totally does not suck. It’s AMAZING. And it changed my legs’ life. They get out so much more often now!

It’s super easy to put on; it comes in a spray so you spray it on, but you also have to rub it in. It’s kind of like a spray lotion, I’d say. And it takes about 30 seconds per leg to cover everything and give yourself an even “glow.”

Witness: here’s after I’d done one leg, but not the other. Can you tell which is which?

legmakeup3Like, DUH. The one on the left is sprayed. Check it from further away:

legmakeup4The thing I like about it is that it doesn’t make your legs look fake. You can still see the natural, ahem, personality in your legs, but it’s toned down, muted just a tad. And everything is smoothed out. And, as you see here, tanned up a little (you can choose whatever shade you want, so you don’t have to have a tan effect, though). The color is just temporary, so you don’t have to worry about messing it up and having streaky legs for a week.

Here they are both sprayed up:

legmakeup5Don’t they look better? I’m feeling a little weird showing so many pictures of my legs here but I felt compelled to share my good fortune with you.

I have to give you a few tips, though.

  • To apply, spray a little on and immediately, and I mean immediately, rub it in. I almost start rubbing before I’ve sprayed. It comes out darker and a little splattery, so you want to rub it in like a lotion. Spray different sections, a little at a time, and smooth it in. Don’t try to do your whole leg at once.
  • Since it is a spray, I usually put it on in the shower. Not while I’m showering, mind you, but after I’ve dried off, I’ll step back in to spray my legs so the shower stall contains any misfires.
  • Make sure you wash your hands afterwards, or you will have seriously tan and shimmery palms.
  • You’ll notice the packaging says “water resistant.” They are not kidding! When I get in the shower, the color stays on my legs until I actually wash them with soap. Only then do I see the tan running down the drain. So you don’t have to worry if you are headed to the beach that you’ll have dark drips down your legs. You’re good to go, even if you swim.
  • The color has a slight shimmer to it, too, so your legs will get a nice glimmer to them. It’s extremely subtle, but I like it.

Have you tried this product? I am so impressed with how well it performs. If you’ve used it, tell us how it went in the comments!

{ 3 comments }