DIY Riddle Valentine

riddle valentineI find it pretty hard to come up with ideas for a fifth grade boy for Valentines. You don’t want it to be too cheesy and young, or too twee, but you still want it to be something clever and memorable. What to do?

We went though some ideas this year and finally landed on the scratch off riddle as our winner. I saw a lot of tutorials on Pinterest, but either I’m not doing it right or these tutorials are less-than-honest about their efficacy. Can you imagine? A DIY that doesn’t quite work right on Pinterest?

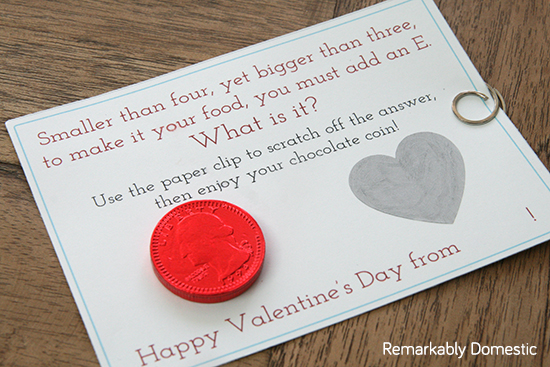
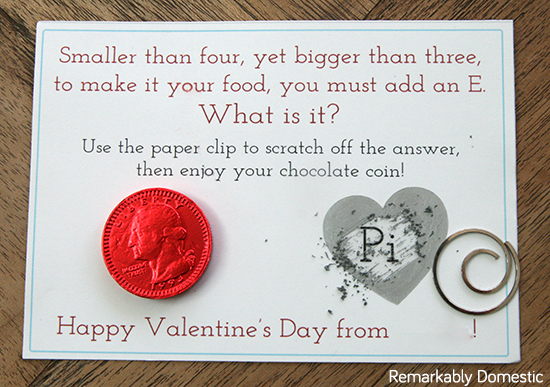
We found a clever little riddle online that has a short answer that fits easily under a scratch off area. Have you figured it out yet?

“Smaller than four, yet bigger than three, to make it your food, you must add an ‘E.’”

It’s Pi, silly!

If you like these, I’m putting the PDF up here so you can use them for you own Valentines. I thought it was just cute enough and not too dorky.

I have a few pieces of advice for you when making a scratch off card. Many of the instructions you’ll find on Pinterest don’t really give you all the details.

The basic instructions are to mix 2 parts acrylic paint with 1 part dish soap, and then paint that over whatever you want to be revealed when the scratching begins. Some tutorials do recommend either laminating the surface or putting down some clear contact paper, and this step really is a MUST. Here’s how I did it.

I cut a piece of clear Contact paper to about 8″ x 11″ size. I taped it down to a surface so it wouldn’t curl, and then I painted the whole thing with the paint/dish soap mixture. I let it dry, and then I painted it again. And then I let it dry, and I painted it again. Most instructions will tell you you’ll probably need 2 coats; I found that you really need 3 or ideally, 4. I suppose it depends on the opacity of your paint, but I used both silver and red and with the dish soap mixed in, 4 coats was really necessary to cover the image.

After painting and drying several coats, my sheet was ready. Luckily, I have a Silhouette, so I simply created a page full of heart shapes and sent my paper through the Silhouette, painted side down. If you don’t have a cutting machine, you can cut the shapes by hand. If you have a lot of Valentines to make, I’d recommend simply using a square or a rectangle and cutting with a paper cutter.

riddlevalentine3
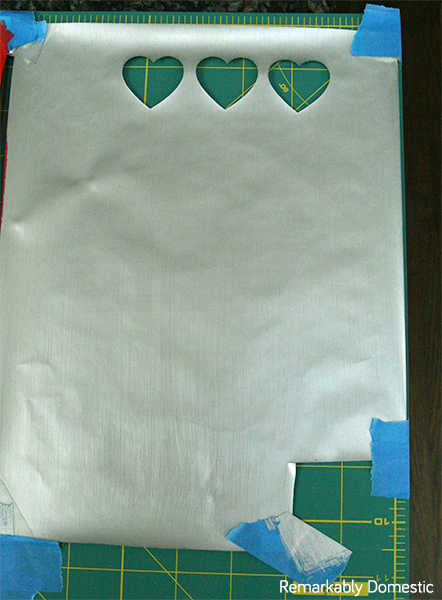
Here you can see my painted piece of Contact paper, with a few test cuts I made with the Silhouette.

Once you’ve printed out and trimmed your Valentines, simply peel and stick the pieces of painted Contact paper over the answer to the riddle. I then added a chocolate coin as a treat to the front.

Now, the reason I chose the chocolate coin was because some Pinterest tutorial said you could scratch off with this chocolate coin. Wouldn’t that be sweet? Yeah, doesn’t work. This formula for making scratchable areas is sufficient, but you have to scratch pretty hard to get the paint off. A piece of chocolate is neither hard enough nor sharp enough to get the job done. That’s why I ended up adding a paper clip to the Valentine for scratching purposes. I tried several varieties, because I wanted it to be a cute paper clip, but only the metal ones worked, and even then you still have to scratch pretty hard.

riddlevalentine4So that’s it! It was pretty simple to create, and if you can get past the fact that this scratching mechanism isn’t perfect, I think it makes for a cute Valentine.

Happy Valentine’s Day, everyone!

{ 8 comments }

DIY Steel Wire Bracelet

steelwire1I was at the hardware store some weeks ago, and I saw all these weird components that seemed like they could come together into some pretty cool jewelry. So I wanted to give you all a little series where I make different pieces from things found in the hardware store. It’s fun, right?

First up is my delicate wire bracelet. There are a bunch of different gauges of this galvanized, twisted wire available at your local hardware store, and it’s super inexpensive. Mine was about $0.39 a foot. I liked the thin wire and thought it would look cool with several rounds of it stacked together. Here we go!

Supplies:

  • several feet of galvanized wire, preferably very thin (eyeball it at the store and go for it!)
  • crimp tubes, large enough for the wire to go through twice (if you get a multipack like these Beadalon Crimp Tube Variety Pack you’ll have several sizes and can choose the one that fits best)
  • jump rings
  • a clasp
  • jewelry pliers
  • wire cutter

To start, cut your wire into appropriate lengths. This bracelet looks best when it’s relatively tight around your wrist. Keep in mind that you are going to be folding about ½ inch of each end over. I cut mine to about 8″, and I wanted 5 strands.

Take a strand of wire and bend about ½ inch over. It’ll take a little muscle since this is pretty strong wire.

steelwire3Crimp it with your fingers or some pliers to make a bend like so:

steelwire4Slide a crimp tube onto the wire from the other end and move it up towards the bent end.

steelwire5This is the hardest part: getting the crimp tube to slide over the main wire and the end of the bent section. You’ll have to squeeze the bend so you can get the end of the wire as flush with the body of the wire as possible. Slide the tube up so it sits over the end of the wire.

steelwire6

steelwire7You only need to slide the tube so that the wire end is just barely poking out:

steelwire8Carefully crimp the tube with pliers or a crimper.

steelwire9And you’ll have this:

steelwire10Repeat the process for the other end, but this time you’ll need to slide the crimp tube on before you start bending the wire. Once you’re done, you’ll have a wire with two loops on either end.

Repeat the entire process for all your wires. Now, gather up your wires and connect all of the ends together with a jump ring.

steelwire11Once you’ve connected one end, you can connect the others with a jump ring; be careful to keep the wires in the same order.

Attach a clasp to one end, and then close the clasp. Using your hands, mold the wire a bit so that it’s slightly more rounded.

steelwire13

steelwire14And you’re done! Simple, inexpensive, and I love the delicate look it gives.

steelwire2

{ 1 comment }

Ombre Paper Jewelry

ombrepaper11W

Have you seen all the cool paper jewelry there is out there? My favorites are the ones from Jessica Jones at How About Orange. They are perfect and geometric and super cool.

I decided to do my own take on these pendants, but adding one extra element. And what is the one thing I will always add if I can? OMBRÉ!

It occurred to me that since you are stacking up piles of paper, you could use different shades and get a kind of fun gradient effect. Check it:

ombrepaper15I love how the ombre is subtle but gives your pendant some depth. And it makes it reversible, too, so that you get a light color on one side and a dark color on the other, so you can switch it up whenever you want.

If you want to make some, the easiest way to make a complex paper cutting is to use a cutting machine, like the Silhouette. If you don’t have a machine, though, you can make slightly simpler ones with paper punches. I’m going to show you how to make them using a punch, since that’s the easiest tool to acquire, but the process is the same if you use a cutting machine to make your shapes as well.

Here’s all you’ll need for the pendant:

ombrepapersupplies

  1. 3 or 4 shades of one color of scrapbook paper (this should be cardstock, not regular printer paper)
  2. A punch of your choice
  3. Mod Podge Hard Coat (optional, really)
  4. Spray adhesive

Start by cutting out your shapes. You ultimately want to have about 12 layers, so if you have 4 colors you can cut 3 of each color.

ombrepaper2Pile your shapes by color.

ombrepaper1Now it’s time to start gluing. Begin with the darkest color. Spray one of the pieces with spray adhesive and attach it to a second piece, making sure you line them up exactly. (Keep in mind that if your shape is not symmetrical, you’ll need to be gluing backs to fronts to make sure things line up perfectly.)

ombrepaper3Continue gluing by spraying a single piece and attaching it to your already-glued pile of shapes. Once you’ve glued all of the darkest color, start on the next-darkest shade. Continue gluing until you’ve used up all your shapes. It will look like the photo below when you finish. And you will have spray adhesive all over your fingers like I do here, too. (Try using Goo Gone or vegetable oil to remove it.)

ombrepaper4

You’ll have a nice pendant that is the darkest color on one side and the lightest on the other, with a pretty ombré side.

ombrepaper6If your shape doesn’t have a hole that you can use to thread a chain through, punch a hole at this point. You may need to punch from both sides to get all the way through your pendant.

ombrepaper7To dry, place your pendant in some wax paper and stick it between two heavy books to keep it flat.

After the glue is dry, coat your shape with two coats of Mod Podge Hard Coat. This step is optional; you could be good to go from here, but if you want to give your pendant a little more durability and a nice, satin sheen, the Mod Podge will do it for you.

ombrepaper8 Let it dry completely. Now you’re ready to attach a jump ring and a chain.

ombrepaper9

A cute little pendant that you can wear with the dark or the light side facing upwards. It’s almost like you have two!

ombrepaper10W

This necklace I made with a Silhouette cutting machine. The shape is so complex, but it takes no time to cut them out with a machine and stack them together.

ombrepaper11W

ombrepaper12W

ombrepaper13W

ombrepapercollage1

ombrepapercollage2Hope you enjoy!

{ 1 comment }

basketweave1

More knotting, y’all!

This is one I’ve been working on for a while. The basket weave knot seems tricky to tie at first, but once you’ve done it, it’s pretty simple. I learned it from JD at TIAT, so if you want to see a video of how to tie this knot, check it out here.

Here’s what you’ll need:

basketweavesupplies

  1. 2 ½ yards of 550 paracord, in a color of your choice
  2. a button of your choice
  3. needle and thread

You’ll also want something to hold the cords while you are tying. I usually use a clipboard, but you can also tape it to a table.

To start, fold your cords in half. This bend will be your clasp loop.

basketweave3

Attach this loop to the table or your clipboard.

basketweave4

Start by laying the right-hand cord over the left-hand cord.

basketweave5

Now the cords have switched places. Take what is now the right-hand cord and bring it up and through the loop, and out to the right.

basketweave6

This is the base from which you’ll weave. Straighten it out a bit.

basketweave9

Now, loosen the knot up a lot, putting the ends pointing upwards.

basketweave8

Next you are going to take each of these large loops and twist each one to the right. Do the right side first, and then the left side.

basketweavemosaic1

Now you’ve got two twisted loops. Place the right-side loop over the left-side loop like this:

basketweave11

Take the end of the cord on the right and feed it through the loops like so:

basketweave13 You’re going over the first loop, under the two middle loops, and over the last loop.

Pull it through.

basketweave15

Next, take the end of the cord on the left side and feed it through in a similar fashion, like so:

basketweave16And pull it through.

basketweave18Tighten up this knot by gently pulling the threads through, starting at the top.

basketweave19You can tighten to whatever size you want. I usually like a smaller knot, so I tighten quite a bit.

basketweave20Now you can see what the knots will look like when finished. From here, simply start another knot.

basketweave21

Follow the exact same procedure as the above for the second knot. Once you’re done, tighten it up so it looks the same as your previous knot.

basketweave22

Continue knotting like this until the bracelet is the right length for your wrist. You could also leave more space between knots if you want a more open look.

Add the button to the end by sewing it on. See my previous paracord tutorial for sewing a button with a shank on; if your button has holes, you can simply sew up through the cords and into the button holes.

basketweave23

And stack them up!

basketweave1You can even stack them with other paracord bracelets, like the ones I made here.

basketweave24

{ 13 comments }