nutcracker1

The other day, we were eating breakfast, and I had given the kids some pistachios. And you know how there’s always a few that don’t have that easy-to-open crack? They are hermetically sealed, and there is no way you are getting in there with just your bare fingers.

Usually, we just leave those nuts, and I throw them back in the bag for some reason until all we have left are the uncrackable nuts, and then generally I throw them away. This day, the kids asked RD Husband if he could help them crack the nuts.

He gave these nuts a good go, but they were, as I say, uncrackable. So he turned to me and he said, “Where’s the nutcracker?”

Where’s the nutcracker?

I laughed. I just laughed out loud. And then I said, “Are we at my grandparents’ house in 1973?”

RD Husband laughed, too, but then he was all, “No, really, where’s the nutcracker?”

Friends, do you have a nutcracker? Who has a nutcracker these days? Honestly, the last time I saw a nutcracker IRL was at my grandparents’ house, decades ago, where they always had that bowl of nuts on the living room table that had actual walnuts like in the shell, and therefore you needed a nutcracker to access them. Do people buy those kind of nuts anymore? Honestly, I have no idea.

So we laughed for a while at the whole nutcracker issue, and then I had a brainstorm. And this is where this post turns into more than just the best story you’ve heard in the last 5 minutes and becomes an actual tip.

Because, facts are facts, and we still had those pesky pistachios and no nutcracker.

You, too, may find yourself in a bind with some sealed pistachios and nothing with which to crack them. Know what you do?

Pull out the garlic press.

That’s what I did. At first, I was going to pound them with the rolling pin, but I realized that wasn’t really the most delicate solution. So I got out the garlic press, stuck a nut inside, and gently, gently squeezed until I heard a distinct crack. Lo and behold, that nut was cracked, both literally and figuratively.

nutcracker2

You can thank me later when you have a plateful of delicious pistachios meats and not a shell to be found.

{ 1 comment }

My Laundry Problem

I have a small laundry problem. It looks like this:

laundryprob

I’ve known about this problem for some time. And my question is, does anyone else have this problem?

It seems like either I’m exceptionally clean or my family is exceptionally dirty.

Or, alternatively, since I’m the one doing the laundry, I only put something in the hamper when I know it’s for sure dirty. I’m just going to have to wash it!

Since I’ve been thinking about this issue (is it even an issue? is this simply the way of the universe? or am I the only one with the mini pile?), I have a few questions for you readers.

  1. How often do you give your kids clean PJs?
  2. How often do you change your PJs? (Sorry, I know this is getting personal.)
  3. Do you, too, have a much smaller pile of laundered clothes than the rest of the family?
  4. Do you make any attempt to reduce the amount of laundry from kids and other family members? Is it even possible?

I’m doing an informal survey. Inquiring minds want to know. I’m terribly interested in your laundry habits, so spill it in the comments. Feel free to remain anonymous if it’s too embarrassing.


{ 3 comments }

I’m going to share something slightly humiliating with you: my former “recipe binder.”

old recipe binder

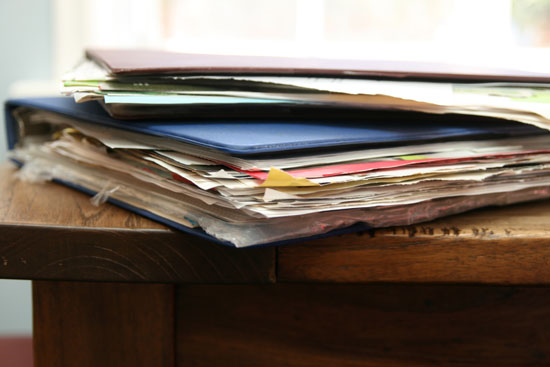
Yeah, it’s as bad as it looks. A long time ago (I mean, like, 10 years ago or something), I got inspired and created this binder for all the recipes I was tearing out of magazines. This was way before Pinterest and iPads and all those good digital ways to organize recipes now. I got lots of magazines in the mail and I tore out a ton of recipes for the binder.

The problem was, after the initial organizing, I kept ripping but I never really placed the recipes in the binder. I’d shove them into the front cover, and the pile grew and grew and grew, becoming this daunting task I never wanted to tackle. And I never looked at it, really, because to find a recipe meant to sift through that massive pile of papers.

Enough is enough, I recently decided, and overhauled the system. Want to see how I did it, and how I achieved recipe enlightenment?

Here’s what you’ll need to create a sleek, organized, useful recipe keeper.

  • lots of torn out recipes
  • a 24-page presentation binder (I got mine at Staples)
  • glue stick
  • cardstock in desired colors, 8 1/2″ x 11″
  • scissors or a paper trimmer
  • embellishments (optional)

Let’s get started!

1. Sort, organize and PURGE.

I went through that massive pile and threw out about 70% of the recipes. They were either kind of duplicates, or something I was no longer interested in, or so old that our eating style had changed. While I was sorting and eliminating, I was putting recipes into piles for categories like desserts, mains, side dishes, drinks, appetizers, etc.

2. Trim.

recipebinder1

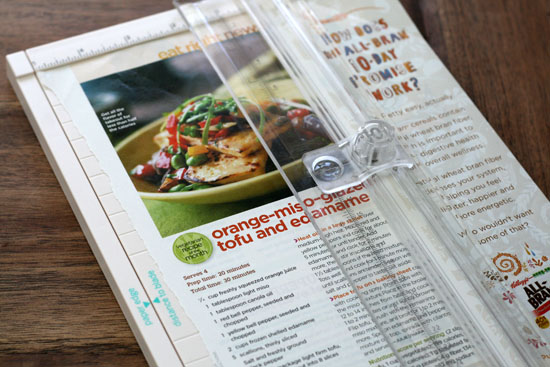
Now, pile by pile, I trimmed each recipe with a paper trimmer. Sometimes, a recipe was just a small corner of a page; other times, there were so many other distracting recipes and things on the page it took me a while to remember which recipe I wanted.

recipebinder2

Now you’ve got a pile of lovely, trimmed recipes.

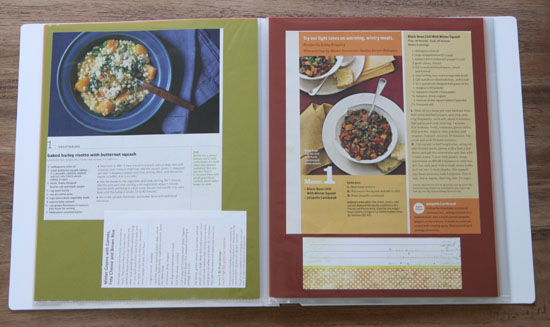
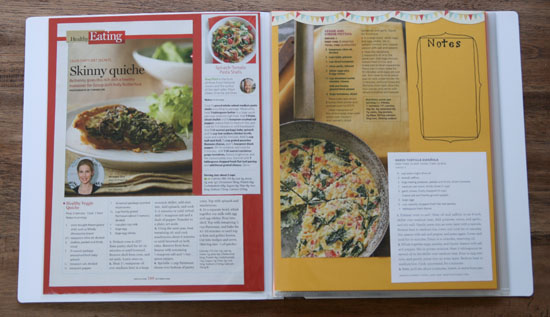
3. Organize and begin pasting.

Decide how you want to sub-organize your categories, if that’s applicable. For me, in mains I had a bunch of casseroles, stews, pasta dishes like lasagna, etc. I gathered them together so that I could keep similar dishes near each other.

Take a piece of cardstock and lay out one or more recipes on it. Glue it down with the glue stick.

recipebinder4

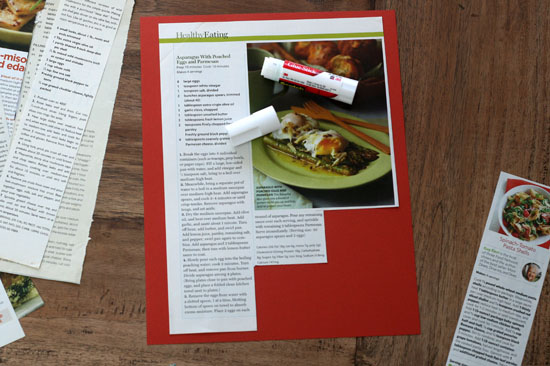
In order to save paper, I then turned the cardstock over and glued the next recipes to the back. If you want to be able to reorganize and move recipes around, you might want to only use the fronts of the paper.

4. Add embellishments.

I like to write notes on recipes, especially since I tweak them relatively often. Only have the chili powder, add mushrooms to this sauce, it needed to cook an extra 15 minutes, whatever, it’s nice to have space to write these ideas. I added some note areas, sometimes with embellishments I pasted in and sometimes by drawing a section for it.
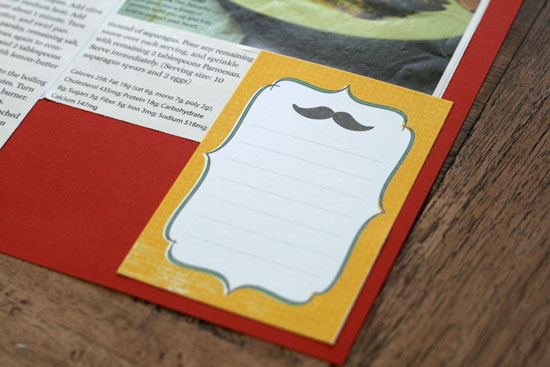
moustache notes!

moustache notes!

hand-drawn note area and bunting embellishments

hand-drawn note area and bunting embellishments

Here where you can be as decorative or as utilitarian as you please. If you just want to get it done, paste and leave it! If you want it to be lovely (make one as a gift?), prettify to your heart’s desire.

5. Slide your papers into the page protectors inside the presentation binder.

recipebinder3

6. Make a label for the side and the front cover.

recipebinder7

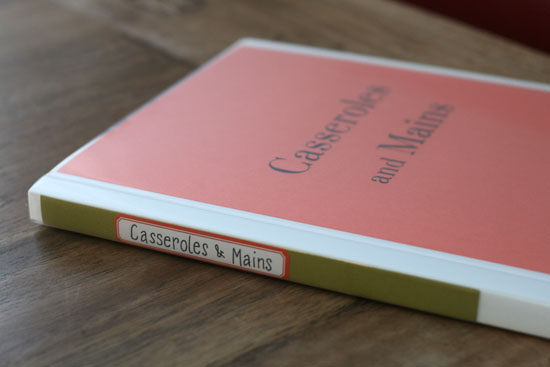
I made this label to slip down into the spine of the binder so I can change it up later.

That’s it! Now you have a lovely book that’s easily contained, and recipes are organized. Make one for each category, or divide one into several categories with adhesive page tabs.

recipebinder8

A few tips to think about:

  • Decide on a recipe limit. I had so many recipes, I was never going to have enough time to cook them all. By using these presentation binders, you give yourself a finite limit on the number of pages you can add. That keeps everything under control, for the most part. Once the binder is full, you’ll have to ditch a recipe for every new one you add, which keeps a constant but manageable reassessment going.
  • Consider using removable adhesive. If you have a lot of recipes that you haven’t made, you might consider using a removable adhesive so that you can pull off any recipes that just don’t work. I went full monty with the regular glue stick, but if you want to be able to ditch something easily you could use something like this Restickable Glue Stick.

How do you organize recipes you pull out of magazines? Have you gone full digital? Or are you still keeping a paper set of recipes?

{ 6 comments }

Craft Area Tour

I can’t really call it a craft room tour, since I don’t have my own room dedicated to crafting. Someday!

After I showed you my new cutting/sewing table set up, I mentioned I’d give you the rest of the tour. So here goes.

craft area

This is a kind of overview of about 2/3 of the space. You see my new addition on the right, which is, of course, flanked by cat beds. That large pillowy one used to be a dog bed, but the cat totally appropriated it. So I got the dog a bigger new one and let the cats go crazy with that one. Sometimes they like to snuggle in it.

craft room cats

To the left of the window, you’ll find my homemade necklace/jewelry holder (tutorial here!) and the built-in shelves, almost all of which I’ve taken over with craft stuff.

craft room 2

On these shelves I have all my craft books (they’re really starting to become a whole library!), jewelry making supplies (on the shelf below the books), and a filing cabinet that has my files in one drawer and then another drawer filled with paper, stickers, etc. I also have a bazillion photos to scrapbook, or do something with, and a plastic set of drawers that holds stamps and other miscellaneous things.

What you can’t really see in the initial photo is what is to the right of everything else, which is this wall with a fireplace and my desk.

craft room 3

I used to sew at that desk, hauling the machine up and down whenever I wanted to use it. I’ve got the printer on top of the desk, and on the mantel of the fireplace I keep my Silhouette and some small file holders. See that jumbled mess all the way to the right? That’s all the kids’ artwork I’m trying to corral. On top of the thin rolling plastic drawers, I have all my new calligraphy supplies… calligraphy is my latest obsession.

I love this desk because it folds down. Here’s what it looks like when I’m working:

craft room 4

I’m just kidding! It NEVER looks that neat.

Now, come, look inside my drawers…

craft room 5

Ok, well, this isn’t a drawer, it’s just the cupboard in the desk. But that’s where I keep extra sewing supplies, cutting boards and paper cutters, my new Bind-It-All (LOVE!), and other miscellaneous things that don’t fit anywhere else.

In the middle drawer of the desk you’ll find punches,

craft room 6

and in the other drawers I have paper and stationery. In the plastic drawers on the built-in shelving you’ll find stamps and ink pads,

craft room 7

a drawer of cool yarns for which I only have one skein, and a drawer of total miscellany:

craft room 8

I’m not even sure what’s in there at this point. And I just reorganized it.

I thought you might want to see my main craft books up close, so here you go:

craftroom9

I need to start making more things from these books!

So that’s the place where it all happens. Mostly. I have a whole other studio in the garage, but that’s a completely different story.

{ 0 comments }