One of my favorite crafty blogs is Cheri’s I Am Momma Hear Me Roar.  That lady can craft like nobody’s business, and I’ve learned freezer paper stenciling and how to use Picnik straight from her blog.

So I was super excited when she decided to host a contest just for boy crafting– specifically, for a boy t-shirt. Having two boys myself, I totally get the dearth of good boy craft projects.  So I set out to make something cool.

I Am Momma Hear Me Roar

I’ve been waiting to try out the freezer paper stenciling, and just the other day I saw this post about “batik” table linens from Martha Stewart’s Craft of the Day email– I use scare quotes here because it’s really nothing like batik, but that’s what they call it.  I decided to combine them with an idea I had been mulling over to make a kind of pointilist graphic tee for my four year old.

I wanted to take a more abstract-ish graphic of the globe and render it in pointilist fashion on the t-shirt.  So I found a globe I liked and gathered my supplies.  You will need:

  • a white t-shirt
  • a graphic printed out to the size you’d like on the shirt
  • freezer paper
  • fabric markers
  • tape
  • a hole punch, preferably with three size holes and that will punch anywhere on the page**
  • self-healing mat
  • an iron

** Side note here on the hole punch.  I highly recommend the Martha Stewart Screw Hole Punch.  You see it pictured in the photo below.  What’s great about it is that it punches anywhere– that is, you can punch right in the middle of the page because it doesn’t have a hinged mouth-like opening.  It also comes with three interchangeable sized circles, which all fit snugly and neatly in the top, under a screw cap.  It’s really an ingenious design.  You can find them at Michaels.

getting set up

First, tape the graphic to the back of the freezer paper.  You want the shiny side of the paper facing down, so you can trace the image on the matte side.

i printed my graphic out on scrap paper

Flip the paper over so your graphic is under the freezer paper, and start tracing the image onto the freezer paper.  You basically just need to know where one color ends and the other begins for this project.

tracing the globe

When it’s done, you should have something like this:

You’ll notice I’ve really just indicated where I’ll have different colors; the parts I left white I will make light blue (for the oceans).  You can now remove the image from the back of the freezer paper.

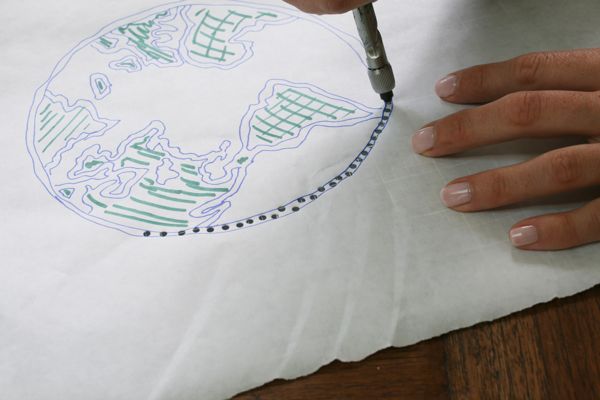
Now it’s time to become a pointilist.  You want to start punching holes in various sizes, knowing that you will color them according to the drawn pattern on your stencil.  I started by punching around the outside; I made all the dark blue (which is essentially the outline) the same size punch– the middle size in my set.

Make sure you can still see where the colors need to go.  Then, start punching the other areas.  When you are all done, you should have something like this:

Then, you iron it onto your t-shirt where you want your design to fall.  (If you need detailed instructions on doing a freezer paper stencil, check out Cheri’s tutorial here.)

Now you’re ready to get at it with the fabric markers.  Using a stenciling motion– that is, tapping more than writing or sliding the pen– color each circle the proper color.  Be careful not to let the sides of the freezer paper peel up.

Once you’ve got the whole thing colored in, it will look like this:

Then, you can peel off the freezer paper…

And there you go!  A fun, graphic tee that’s a little different.  I kind of love it.

Here’s the model showing it off:

There you go!  I’m entering this shirt in Cheri’s contest, so keep your fingers crossed for me!

{ 13 comments }

Can you even believe how many blog year’s resolutions I have?  Sheesh!

Welcome to another of my new ideas.  I have some dinky little suggestions here and there, so I thought I’d cull them into a weekly post.  Each week I’ll post a new “tip,” which may or may not be something everyone else thought of at least five minutes ago.  Maybe once a month you’ll discover something that makes you go, “Meh.”

But, to entice you, dead readers (thanks to Natasha, who commented on the ironing post, I’m trying out this new handle for y’all), I’m posting a slightly more involved Tip this week.  Gotta start strong, you know?

Background.  For the holidays, our family got a cool new card game.  We are obsessed.  More on this mysterious game later.

The problem is, the four year old has a really hard time holding his hand of six cards.  He keeps them in a big pile in his sweaty little fists, and every time he has to play a card, he has to shuffle through them one by one.  I’m getting tired of waiting.

A while back, my sister-in-law, who is honestly the most amazing mother on the planet, showed me how to make a card holder for little hands.  It’s super easy to do and allows them to hold a fan of playing cards with no effort.

All you need is a plastic lid, something to cut with, and a stapler.

Now, I got all fancy here with the rotary cutter, the cutting mat and the ruler, but really you could just use a pair of scissors.

First, cut the lid into two relatively equal and even halves.

When you stack them together, you should have a half circle.  Stack them with the exterior of the lids facing and touching each other, so that they are flush.  What would be the interior of the lid should be facing outwards on both sides.

Staple the two pieces together only along the bottom, where you cut.

Depending on the size of your lid, you’ll need a few staples.  I put in three.

Then, you’ll have this:

At this point, you’re really pretty much done.  I wanted to cover the staples, though, just for safety.  You can use regular tape, but I happened to have some lovely Japanese masking tape around, so I used that.

I taped it all the way around the lid, which made for a kind of messy look because of the rim.  But the four year old isn’t picky.  If it bothers you, you can simply tape each side independently, ending right before the rim.

Now, you can decorate it, or let your kid decorate it, or write a name on it, or just leave it.

To use, you fan out your hand of cards and stick them in the curved top of the holder.  The lid pieces should be tight enough that they will hold your cards steadily.  And look how happy you will be!

The four year old is here holding cards from our new game.  It’s called Mille Bornes, and yes, my friends, that is French.  Apparently RD Husband and his siblings played this game all the time when they were kids, and my sister-in-law (the one who taught me this tutorial, don’t you know) happened to see it somewhere after all these years, and she bought it for us.  We played a bunch of games with RD Husband’s family over the holidays, and now it’s all the kids want to do.  Which is fantastic, because it’s a pretty fun game, and all they used to want to do was play Wii.  They especially love shouting “Coup Fourré!” when they get one, and I love that it sounds like “Coofray!”

You can get the game at Amazon for $5.49.  It’s a steal, yo.  Have you ever heard of it or played it?


{ 10 comments }

New Year’s Resolutions

Happy 1-1-11!

We’ve been talking about New Year’s Resolutions over here at the RD house.  The kids decided they’d like to get in on the action this year.  So, this morning, the boys were up early and then showed up in our room with the following lists:

seven-year-old resolutions

These are the seven year old’s resolutions.  I find them completely hilarious and totally endearing.  RD Husband is constantly asking him to stop walking on the couch… he’ll be playing Lego, just waltzing around but walking all over the couch, even the back.  I guess he’s getting tired of hearing “STOP WALKING ON THE COUCH!”

From me, he’s constantly hearing, “USE YOUR FORK!”  How can a seven year old never use his fork?  I was happy to hear at a New Year’s party last night that he is not alone in the barbaric finger feeding camp.  Still, child… please?

I’m not sure where “Get more sleep” came from, but I’m all for it.  And “Be nice to brother” is so sweet, but also likely impossible.

The four year old brought this in.  He dictated to his brother.

the four year old's resolutions

I’m glad to see that “Eat good veggies” and “Drink good liquid” are on the list, because the four year old does have a bit of a sweet tooth.  Healthier eating would be good for him.  I think they got together and came to some agreement on the “Be nice to brother” resolution, but if it leads to less fighting, then… YAY.

I love that this kid also wants to “Plant more trees” this year.  As if he’s really planted any trees in the past.  I’m not sure what we’re going to do about that one, but I’ll be sure to keep you posted.

As for me, my resolutions are:

1.  Drink more water.

2.  Exercise at least 3 days a week.

3.  Eat only high-quality sweets, and in moderation.

I have a few more, but I’m not committing myself completely because I know these three are already going to rock my world.

Do you make resolutions?  What are your plans for 2011?

{ 2 comments }

Happy New Year!

Goodbye, 2010.  It’s been real.

I’m planning some new stuff for 2011 here, so stay tuned.  It’s gonna be off da hook, or whatever it is the kids are saying these days to describe something cool.

I wish you all a very happy, healthy, and safe 2011.  And if that means you have to sleep with your Civil War reenactment rifle and your secret agent baton, then so be it.

{ 3 comments }