


For my review of the Sally Hansen Insta Gel Strips, go here.
For my experiment using regular polish with the gel system, go here.
So, I mentioned in a recent post that I discovered this Sally Hansen at home gel nail kit, and I jumped on it since I love my gel manicures. I wanted to give you all a more in-depth review and show you some images since I haven’t seen a lot of detailed reviews around the interwebs.
The product I bought was the Salon Gel Polish Starter Kit, NOT the Insta-Gel Strips. This is an important distinction. I’ve tried those “strip” polish thingys before, although not in the gel version, and in my opinion, they are a total pain in the keister. They’re always wrinkling, and it’s so hard to get them to sit just where you want on the nail. So this kit is actually polish that you paint on your nails, like a regular gel mani at the salon.
First, let me tell you, I LOVE this kit. It’s exactly what I’ve been waiting for. I’ve been tempted to buy an at home gel kit for a while, but the ones I was looking at at Sephora were between $150 and $200, and I thought, if they don’t work that well, that is a lot of money to have wasted. So when I saw this kit at $65, it seemed perfect. I pay $45 for each gel mani at the salon, so by using it twice it will have paid for itself. (Actually, I’ve already used it 3 times, so it’s done and paid for!)
Besides the fact that the price is right and it’s readily available at stores like Target, it actually works really well. It’s really not that different from a salon gel mani, except you have to do it yourself.
I would say that the only downside, in fact, is the DIY element. If you aren’t skilled at painting your nails, you might get a little frustrated. But otherwise, it is a total go.
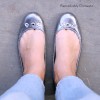
Let me show you a few images. I did a manicure a few weeks ago with a nice deep red color called “Ruby Doo.” This is what the manicure looked like after about 10 days:

So, pretty nice, right? You can see that there’s some new growth down by my cuticles; that’s one of my biggest problems with the gel mani. It lasts plenty long, but my nails grow so fast that after a week or 10 days, I need to redo it because the growth looks weird. So having the option of doing it at home more frequently and not having to pay for all those salon visits is great.
Taking it off is really easy, too. I’ve tried all the salon versions: Oxxium by OPI, Gelish, Shellac, you name it. And I found that some of them come off easier than others. This Sally version comes off really well, as long as you keep them wrapped for the allotted time. If you aren’t familiar with the wrapping version of removing gel polish, you take a cotton ball, soak it in acetone polish remover, put it on the nail and wrap it in aluminum foil to keep it on there. What I do at home is take those flat cotton rounds, like these, cut them in half, and soak them in some acetone. Then I put them on the nail and cover it with foil.

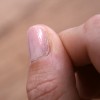
Now, here’s where you have to follow the directions and not be impatient. If you leave the foil on for at least 10 – 13 minutes, the polish will literally flake off. Basically all you have to do is brush off your fingers. If you try to hurry it up and check it after 8 minutes or so, there will likely still be some polish adhered to the nail, which can be hard to pry off. And the prying damages your nails. So sit back, watch some Homeland or something, and let the acetone do its work.
Here’s what you get once you take the foil off the nails:

It really does just flake off. Then, you can shape and file and attend to your cuticles and whatnot, and start the polishing process.
The kit comes with a small LED light, which fits all four fingers at once, and then you do the thumb separately, to ensure it gets dried properly. Since it’s an LED light, it cures the polish much faster; I’m used to having my fingers in the lights at the salon for 3 minutes per coat, but with this little light, it’s only 30 seconds. It’s amazingly fast.
The process for applying the gel manicure is the same as at the salon. There’s a base coat, then LED curing, then 2 coats (or more, if you prefer) of color, with curing after each, and then a top coat with curing. Then you use some alcohol (or the little alcohol pads the kit provides) to wipe them clean and shine them up. Boom! You’re done.
I really couldn’t be more delighted with the kit. I’ve already stocked up on 5 or 6 different colors. I still plan to get a salon manicure, every once in a while, maybe once every 2 months? That way I can get my cuticles professionally “groomed” and just maintain at home.
After I took my Ruby Doo off, I used “Commander in Chic” to do this manicure:

A few tips I’d recommend with this kit:
~ Do one hand at a time, as the instructions suggest. Much less chance of a slip up.
~ Make sure you keep the acetone pads on your nails for at least 10, and probably more like 13, minutes. You will be able to tell when all the polish flakes off. You shouldn’t need to scrub or pry it off.
~ Use a cotton swab dipped in acetone to fix any mistakes, i.e., polish on your skin, before you cure it. Otherwise, it’s a little hard to peel off your skin.
So, if you are a fan of the gel manicures, I highly, highly recommend this system. I’m so glad I found it!
Let me know if you have other questions in the comments!


I’ve used this twice now and it has started to lift or chip after 2 days? Not sure what doing wrong?